
User Manual

www.frsky-rc.com
25/04/11
1) Place the model at least 60cm (two feet) above non-metal contaminated ground (e.g. on a
wooden bench).
2) The receiver antennas should be separated in the model, and do not touch the ground.
3) Place the antenna of the transmitter in a vertical position.
4) Turn on the transmitter and the receiver, press the F/S button of the transmitter module for 4
seconds to enter range check mode, the RED LED of the transmitter module will be off, GREEN LED will
flash rapidly, and the beeper will sound. The effective distance will be decreased to 1/30 of full range.
5) Walk away from the model while simultaneously operating the controls on the transmitter,
confirming that all controls operate normally to a distance of at least 30 meters (~30 yds).
6) Press the F/S button of the transmitter module for 1S-4S to exit range check mode, RED LED
will be back on, indicating normal operation is back.
2.3 Setting failsafe
Failsafe is a useful feature in which all controls move to a preset position whenever the control
signal is lost for a period of time. D8R-II supports failsafe function for all channels.
Follow the steps below to set failsafe positions for each channel:
1) Bind the receiver first and turn on both the transmitter and the receiver;
2) Move the controls to the desired failsafe position for all channels;
3) Press briefly the F/S button on the receiver (less than 1 second). The transmitter module will
make a long “beep”, indicating the failsafe position has been set in the receiver.
To disable the failsafe function, re-bind the receiver.
2.4 LED status
RED LED GREEN LED Mode
On Dimly On Normal Operation
Blinking Off No Signal
Blinking On Binding Successful
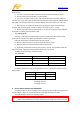
2.5 Pins definition
It should be noted that 3.3V only has a limited driving current (1~10mA), it should not be used for
driving a MPU.
Rx Tx G
A2 X G
A1 X G
Rx: input to receiver, RS232 level
A2: Voltage max 3.3V
A1: Voltage max 3.3V
3. How to switch between two PPM modes
Turn the transmitter off, connect the battery to the receiver, press the F/S button of the receiver for 6
seconds and then release. The red LED will flash fast in HS mode and slowly in FS mode.
The mode alternates each time this procedure is done.
Warning: HS mode is only applied for high-speed digital servos.
Other servos should select FS mode, otherwise servos will get hot and may burn out.