
User Manual

3.3.2 How to setup an alarm for battery sensor readings (3-cell LiPO, connected to A2
telemetry RX port)
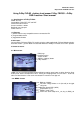
In order to program low-battery alarm at a certain battery level, you should go to “MENU” Screen
(section 3.2 of this manual) and than in “Alarm Set” section choose A2_1 and enter the following
values underneath:
1 < 218
Where:
1 – is a level (volume/frequency/number) of beeps (0 – no beep, 1 – low beep, 2 – meduim, 3 –
high)
< - means lower than
218 – a value at which alarm starts working
WHY 218???? 218, in this case means = 11.25V. i.e., 3.75V/cell for 3-cell LiPO. How to calculate
this value or setup your own:
(desired Voltage (V) / voltage divider (4 – as it is defined by our soldering type) / 3.3V) х 256
(number of values that A/D converter can have, from 0 to 255)
Example: we want alarm to sound when 3-cell LiPO would reach 11.25V (3.75V/cell) discharge level:
(11.25V / 4 (divider for 2S soldering type) / 3.3) х 256 = 218
Now, using this formula – you can calculate the appropriate value for any battery discharge level.
Moreover, you can setup 2 alarms for the same sensor|port. For example, alarm could sound low at
12V level and sound high at 11.23V level. To do this, go to “MENU” Screen (section 3.2) and set all
values for A2_1 and than A2_2 alarms in “Alarm Set” section. Last digits here stand for 1-st and 2-nd
alarm.
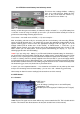
3.3.3 How to setup RX-TX signal level alarm
In order to setup an alarm for RX-TX signal fall-down/loss – you should go to “MENU” Screen
(section 3.2) and in “Alarm Set” section choose RSSI and set the following values underneath (as
recommended in the manual):
RSSI_1
1 < 45
RSSI_2
2 < 42
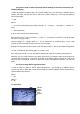
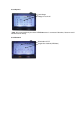
3.3.4 Screen-2
Altitude
RPM
Speed
Rate
Ampere