
User Manual

key goes to the next page, while a LONG press goes back to the previous one. EXIT goes back to the main
views. In all model menu pages a long press of the MENU key will bring up a channel monitor to allow quickly
checking the influence of a change in settings on the outputs.
The navigation in a menu is simple: The +/- keys will navigate up/down between editable fields, or lines of fields
depending on the screen.
ENTER will enter the line of fields when applicable, then edit mode. In edit mode, +/- will change the value,
ENTER or EXIT will validate the input and return to navigation. EXIT always goes back to the previous
navigation level.
In edit mode, we have four 2-key shortcuts available:
● +/- together: Invert value
● -/ENTER: Set value to 100
● EXIT/PAGE: Set value to -100
● MENU/PAGE: Set value to 0
Another handy feature is the auto selection of physical inputs in the relevant fields. Instead of choosing a source
or switch with the + and - keys, just move the pot or flick the switch you want, and it will be recognised. For
switches the position is also auto-selected, and the +/- double key combination will allow selecting the opposite
position (!Sxy) in a pinch.
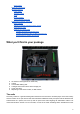
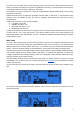
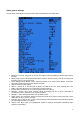
Main views
We have 3 main views showing the same basic information in the top part and different inputs/outputs on the
lower part. On the main views a long press of the ENTER key brings up a menu where you can reset the timers,
telemetry data (min/max values, altitude, GPS home...), all of those, bring up a statistics view (throttle graph,
timers), or show the developer credits. As mentioned above, a short press of the PAGE key switches views.
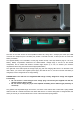
The new title bar includes radio battery voltage, receiver signal strength (for FrSky telemetry-capable receivers),
main onboard voltage (can be receiver battery, flight battery, or anything else depending on sensors the
"Voltage" parameter in the telemetry settings), status icons (SD present, USB connected, trainer port mode,
logging in progress), audio volume and time.
The other "always present" items are model name, flight mode, and trim/pot positions. The logo is of course
customisable, you'll be able to load your model's photo there! See this thread for a great collection of models
made by the community.
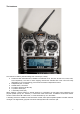
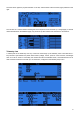
The first view lists the physical switch states in the bottom left zone, and the 2 timers (when enabled) on the
right.
The second shows the gimbal and switches positions, and is handy to check that all the physical controls
respond as intended.
7