
User Manual


○ nogvars: Disables global variable support and the associated menu page.
○ ppmus: Displays channel values in microseconds instead of %.
○ sqt5font: An alternative display font.
○ faimode: Disables all telemetry except for RSSI and voltage, for compliance with contest
regulations.
○ faichoice: Adds a menu entry in the radio general settings to enable FAI mode. Allows you to
train on contest day with telemetry, then turn FAI mode on in the menu before the contest to
disable telemetry. FAI mode can then not be turned off on the radio again without connecting to
a computer to avoid cheating.
● SD structure path: For the Taranis and sky9x board, this lets you choose a folder on your hard drive
where you have made a copy of what is on the SD card of the radio. This allows OpenTX companion to
populate the model image selector with the images that are on the card, and do the same for audio files.
● Automatically add version number to firmware files: When downloading a firmware file, its name
includes the selected options. If this box is checked, the revision number will be appended to the
filename to make it more convenient to maintain files of different versions.
● Default Stick mode and channel order: These will be applied when creating a new EEPROM document
in OpenTX companion.
● Profiles: Allows storing different setting sets and easily switching between them. For example, if you
have 2 different radios with different firmwares or board types it is not convenient to have to redo all
settings (firmware selection, ticking options,...) every time you want to do operations on the other radio.
So you can configure all settings, choose an empty profile with the number box, type a name to identify
the particular radio, and click save. Do the same for the second radio. You will now be able to select the
correct profile for the radio you are about to work on with the profile selector button and menu entry on
OpenTX companion's main window. Note that the profiles can also store and retrieve each radio's stick
calibration and hardware settings (voltage alarms, audio modes,...) from the General Settings page of
an open document. This allows copying a document from one radio to the other without needing
recalibration or reentering the hardware settings.
● Joystick: This lets you configure a joystick to simulate the sticks in the radio simulator.
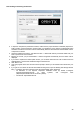
For a Taranis radio, the first thing you would do is select "OpenTX for FrSky Taranis" in the firmware dropdown.
Select your firmware language, and the voice language. The top Download button will compile and download
the latest available firmware version with the selected language and options. The bottom Download button will
open your web browser on a page showing you a selection of voice packs available for the selected language.
Set your flight mode and preferred channel order in the dropdowns below, and dismiss the Preferences dialog
with OK for now.
Simulating the radio
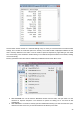
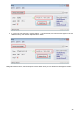
You can now create a new document. A window will appear, with the first line being the radio's general settings,
and the next being the model slots. You can have a look in the general settings and create a model by
double-clicking in an empty slot.
There are 2 ways to simulate either a model or the whole radio.
● In the model editor, the bottom Simulate button will open the model simulator with the current settings.
Note that if a change is made in the model while the simulator is open, it needs to be closed and
reopened.
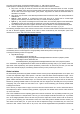
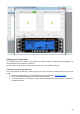
● At the bottom of the "document" window is a "Simulate Tx" button that will open a similar simulator,
however this time with an extra tab showing the radio's LCD screen and UI buttons. The virtual radio will
have the same data as the document when the simulator is started. Note that changes on the radio
interface are not carried over back to the document.
34