
User Manual

● Set the servo parameters. Take good care of the mechanical setup, the better it is the easier the radio
setup and the more precise your controls will be. If you need to use subtrim to artificially shift a control
(for example in case of flaperons that need a far greater throw on the low side than on the high side),
remember to use the "=" output mode to keep symmetry.
● Always define control throws using the Sticks screen.
Now the throws are adjusted, the mixer is set for good logic and the outputs are set for good mechanical fit. As
every part of the setup is clearly separated, should you need to change something any adjustment will only
require intervention on one of the screens. If you crash or change something mechanically, it will be the
SERVOS screen. If your throws are too big, Sticks screen. If a compensation amount or mixing ratio is wrong,
mixer screen.
Remember that there are custom switches that can be set to combine various functions, for example allow
activation of some mixers only if another one is active, etc.
It is also good practice to make use of the "Safety CHx" custom function to define a safety switch for the throttle
channel of electric models. Select your throttle lock switch, select the correct function for your throttle channel,
set the value to -100, then tick the box. While you should always set up your model without it being powered, or
at least without a prop mounted, the safety box is there to avoid forcing the channel to the default value of 0
(mid throttle) while browsing the function list if your switch is active.
The "Instant Trim" custom function can be used if you expect your model could be badly out of trim on the first
flight, see the Custom Functions section for a full description.
Once the flight is over, the "Trims -> Offsets" function at the bottom of the SERVOS page can be used to
transfer the trim contents into the subtrim settings. Be aware that unless the servo mode is set to "=" an
excessive subtrim amount can lead to dissymmetric throws and influences settings like differential.
Advanced features
Flight modes
Flight modes in OpenTX are relatively simple compared to most radios. The settings are simple: A name
(displayed on the main views), a switch to activate them, a trim setting and 2 fade in/out settings. Yet they are
very powerful, because the main settings are actually just located somewhere else: in the D/Rs and mixers.
Each of these has a flight mode selection list, that will determine in which one(s) they are active. So (nearly)
everything is done through dedicated mixers. The mixers that are controlled by a flight mode will see their
activation fade in/out according to the mode's settings. As the trims can be made flight-mode specific (they are
by default), using flight modes to activate things like gear or flaps allows using the separate set of trims to
counter the extra drag that often causes an effect on pitch.
Telemetry values
The following will assume your radio is loaded with a microSD card and a valid voice pack, which should be the
case as it is supplied with the radio. Probably the most important telemetry value is RSSI, which is an indication
of how much signal the receiver in the model is seeing from the radio, and will warn you in advance if you are at
risk of losing control be it due to external interference, excessive distance, badly oriented or damaged antennas
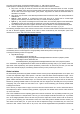
etc. The telemetry settings page gives you 2 alarm levels you can set that will be announced in clear voice ("RF
signal low" and "RF signal critical"). They are set by default to levels that have been considered suitable and
safe for normal line of sight flight (45 and 42), but if you want to adjust them yourself the following explanations
will be useful:
RSSI on FrSky equipment is represented using a logarithmic scale (dB), not in %. This means that when RSSI
is high, a small difference in distance between the transmitter and receiver will lead to a big change of the RSSI
value. It is perfectly normal to see a value of about 100 when next to the model, and already down in the 70's by
the time you've walked to the other end of the field. When you have a reading of 50, it will however take a lot of
extra distance to reach the alarm level of 45. The basic approximation rule is that a doubling of distance
between pilot and model will result in a drop of 6dB of the RSSI value, which should make the previous
28