
User Manual
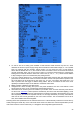
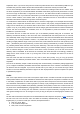

Servos screen
Now that the mixer is configured and the controls' behaviors are defined, the next step is to set up the way these
orders will be carried through to the servos. At this point you'll want to actually connect your servos to your
receiver, remove the control horns from the servos, the props from the motors (safety first), and connect a
receiver battery. Bind the receiver if not done yet.
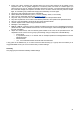
Center all controls (you can look at the channel monitor and aim for 0), and for each servo start by mounting the
horns so that they're as close to perpendicular to the control linkage they're going to drive as possible. Murphy's
law ensures that it's always right between 2 of the steps, so use the PPM center adjustment to make them
perfectly perpendicular. Using this setting instead of subtrim avoids losing throw, and makes sure the outputs
seen in the channel monitor are real "control" inputs. Connect your linkages so that the control surfaces are at
neutral (or middle of their expected throw for things such as flaps).
Now move the radio's controls carefully to exercise the servos but being aware of possible mechanical binding.
Set servo reverse where needed. Adjust the linkages in order to have a little more throw than what you'll ever
need in both directions. If there is a little binding on one side to reach the appropriate side on the other and/or
the throws are not symmetrical it's not a problem.
Then adjust the min and max limits. These should be set so that:
● You have a little bit more throw than what you'll ever need
● There is no mechanical binding
● Throws are the same on both sides with full control input deflection
We're done for this screen. You've already named your channels of course ;)
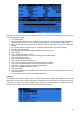
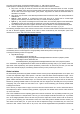
Sticks screen
You've probably noticed there's one thing we haven't done yet - adjust throws. That's what we'll do now.
For each stick, create a rate line. Set the weight to achieve the desired throws. Add expo if desired. This is your
default rate, so don't choose a switch.
If you want multiple rates, create a new line before the default one, enter the new rate/expo, choose a switch.
Repeat as many times as desired. What's important to know is that the first line that has its switch on (starting
from the top) will be the active one. So if you create rates below one with no switch - it will never be active.
Think about the priority if you choose switch combinations that can lead to 2 rates having their switch on - the
top one will override the other. Ideally you should choose your switches so that never happens.
There, we can go and fly!
Model setup guidelines
Time for a little summary. As we've seen, there's literally an infinite number of ways to do the same thing in the
firmware, so let's mention a few good practices when setting up models. If you stick to them they will help you
set up your model quicker, keep your setup clean, and understand what you did 6 months later. With a simple
4-channel model where each servo is controlled by only one control input, if you want to reduce aileron throw
you could do it either with the aileron D/R, in the weight of the mixer line linking the Aileron stick to the aileron
channel, and with the Limits for that channel. For such a simple model it won't matter much where you do it, but
as soon as you'll get to more complicated models with flaperons, butterfly mixes etc, doing it in the limits for
example would simply make it impossible to set up the model properly.
● Start with the mixer setup. As we did above, think about what controls you have on your model and
what they should do, and choose which receiver channel you want to use for each of them. On each of
those channels, create one mixer line for each of the transmitter controls that should act on it. Figure
out the relative amount of movement each of those must lead to, based on 100%. Forget about throws
for now, if one control must have half the authority of the other set one to 100% and one to 50%. Keep
the mixer dedicated ONLY to the "logical" part of the setup. If for example for complex gliders you have
more than one control surface that needs to receive the same group of mixers, isolate those as a
"Function" on a free "virtual" channel you know you won't use it for a servo, e.g. CH10. Then reference
it in the required output channels with a 100% CH10 mixer line. This will save mixer lines and add to
clarity. Name your channels and mixes that aren't self-explanatory.
27