
User Manual

defined on the model setup page to the receiver (channels 1-8 by default), but as those channels are empty in
the mixer screen no servo will respond, they'll all be centered. You won't go very far with that, so you'll want to
add control inputs to those channels. You'll create a mixer line on CH1 by highlighting it and pressing ENTER
LONG, and will end up in the INSERT MIX page. Scroll to the "Source" field, press ENTER, and select the
control you want to act on CH1. You can do it by browsing the list with the + and - keys, or take the easy route
and just move the desired control (if it's a physical one, of course). Move the aileron stick, and the field will
change to Ail (it might have already been there if your channel order preference set in the general settings had
A for the first channel, as that's taken into account). You can leave the other parameters at their default settings,
which mean:
● The mix ratio of this input is 100%, so the scaling of the mixer line's output will be equal to its input. A
value of -50% would mean the output would be half of the input, and inverted.
● There is no offset, so with an input of 0 the output of the mixer line will also be 0. A value here would
shift the response by that much percentage of (input x weight).
● Trim is ON, it could instead be excluded from the calculation (OFF), or one of the other trims could be
used (for cross-trimming for example). D/R and expo (the entries on the STICKS screen for that
channel) are used. Unticking the box would mean the mix receives the raw stick input even if a D/R is
active.
● Differential is 0, so the mixer output will be symmetrical on both sides. A value of 20% would mean the
line's output would be 20% less on the negative side than on the positive one. The "Diff" field is editable,
and by using the +/- keys on it you'll be able to select a curve instead (predefined or custom).
● The mixer line is active for all flight modes. By "unticking" some of the numbers, you would disable that
line whenever the corresponding flight mode is selected.
● No switch is assigned to the line, so it's always active (as long as the modes setting above allows it).
Selecting a switch (physical or logical) would allow activating or deactivating the line when needed.
● Warning is off. If set to 1,2 or 3 the radio would emit 1,2 or 3 short beeps every few seconds to let you
know that line is active.
● Multiplex is Add, so this line is just added to the previous ones on the same channel. If set to multiply it
would multiply the calculated result of the lines above it, and if set to replace it would replace anything
that's above it whenever it's active.
● Delays are 0, so if that line had a switch assigned it would be activated/deactivated instantly when the
switch is toggled. Time is in seconds.
● There is no slowing down, so the line's output reacts instantly to input changes. Times set here are
expressed in seconds to cover the entire range (-100 to +100). If 2 seconds are selected, the line's
output will take 0.5 second to gradually sweep from 0 to +50% if the input was moved by that much or
the mixer line was activated/deactivated by a switch.
● You can also name the mixer line. This name is shown on the main mixer screen, so setting names is a
good idea to help maintain complex setups where you might have many lines on each channel.
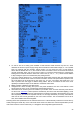
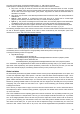
Note that at any time in the Mixer screen and the EDIT/INSERT MIX dialogs you can press MENU LONG to
bring up the channel monitor. This makes it easy to try the different parameters and see their effect on the
channel's output. In addition to this, you will see that on the mixer screen each active line has its name and
source displayed in bold, so it's always clear at any given time as to which lines are actively contributing to the
channel output.
The description is long, but in practice if we now do it again to control CH2 with the elevator stick it will only take
a couple of seconds to select CH2, press ENTER LONG, scroll to Source, press ENTER, move the Elevator
stick, and press EXIT twice. Setting up the mixer for a vast number of basic models is as simple as that. In
addition to the 4 basic channels, if you have a model with flaps that have their own servo and that you want to
control with switch SB you'll just find a free channel to connect your servo to (let's say CH6), you'll scroll to CH6
on the mixer screen, insert a mixer line, flip the SB switch when in edit mode on the source field, and EXIT
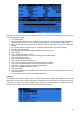
twice. If you want to adjust the up/mid/full positions, a good idea would be to set up a 3-point custom curve. In
the Curve setting, select c1, exit edit mode, and still on the curve field press MENU. You will be brought to the
curve editor. Select "3pt" as type, select the Y value of the first point, and adjust its position. Do the same for the
other 2 points, and exit.
Now something more "complicated", if your model has retracts that you want to control with switch SA (which
has 3 positions) but want only 2 possible output values (in and out) this won't work (choosing SA would give
-100%, 0%, +100%). You'll then use the very convenient MAX source, that represents a fixed value. Create a
mixer line on a channel (e.g. CH5) with MAX as source and +100% weight, you could name it "Gear Up". Now
25