
User Manual

First steps
Now that you've seen the basics and that your battery has some charge, what about a little bit of practice? The
radio comes from the factory with the sticks already calibrated, so the first thing to do with your radio would be
to configure the general settings. Get to the relevant page with MENU LONG, set time, date, sound volumes to
your preference (the lower end of the volume slider is typically needed when using headphones, while the upper
end is good for using with the internal speaker), play with the backlight setting, set the RF country code to your
location, the default channel order to your preference, and the stick mode to match your flying style. Battery
gauge and alarm are factory set for the supplied battery.
The radio will have created an empty model for you, so after having gone back to the main view you'll be able to
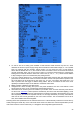
go to the model setup screen by pressing MENU SHORT and PAGE SHORT. There you'll want to make sure
you've set the RF mode that matches the receiver you want to use. When using the internal module, to bind
your receiver select the "Bind" field and press the ENTER key. The radio will beep every few seconds. Now
follow your receiver's instructions for binding (press and hold the F/S button then apply power for D and X
receivers, connect jumper to S pins of channels 1 and 2 and apply power for V8x-II receivers). The receiver LED
will flash fast to confirm binding. Press exit on the radio, Remove the jumper on the receiver if applicable, and
cycle receiver power. You should now have servo control of channels 1-4 with the sticks.
Setting up a model
OpenTX basics
Now that everything works, it's time to stop a moment for some theory about the basic operation of the OpenTX
firmware.
As briefly described above, OpenTX differs from the majority of mainstream radios by its programming
philosophy. Owners of Multiplex radios will however feel at home very quickly, as the principles are very similar.
As opposed to common radios that offer a choice between a limited set of predefined usage scenarios (airplane,
glider, helicopter), a number of functions that are commonly used with such models (delta, flaperon, camber,
butterfly...), and have fixed assignations (sticks always control their respective channels), OpenTX offers a
blank canvas on which you will build your setup: the mixer screen. This approach ensures maximum flexibility
because whatever you do you will never have to work around what the radio expects you to do, which is a
blessing for anybody having to work with "new" model types or configurations which still "don't exist" for
mainstream radio manufacturers, and as such for which the built-in functions are usually useless. So you can
see it that way: For some model types, usual predefined functions can allow setting up a model in seconds (just
enable a function), but for others you'll spend hours trying to get around their limitations. On OpenTX everybody
is more or less at the same level - it might take a little longer at the beginning to set up a seemingly simple
model, but a complicated one won't take much more. As there is no existing function you can just turn on, it will
require basic understanding of how your model is supposed to work, and what you want each control surface to
do. This means that you might even learn something about your model in the process of setting it up!
The control order path starts from the hardware controls, goes through the STICKS screen (anything affecting
control response like dual rates and exponential), continues to the mixer, and ends up being adapted to the
mechanical characteristics of the model in the SERVOS screen.
Everything about the mixer screen
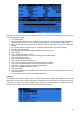
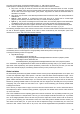
We'll start with this as it is the center of the radio. The mixer screen lists the 32 output channels to which you
can link one or more inputs from a long list of physical controls (sticks, pots, trims, switches), logic sources,
other channels and trainer inputs. Each assignation is done with a mixer line
. A new model will have 4
predefined mixer lines on channels 1,2,3 and 4 that link the 4 sticks to them according to the channel order
preference you have set. These are there purely for convenience, and can of course be edited or deleted.
Let's delete them all by highlighting them, pressing ENTER LONG and choosing "Delete". Your mixer screen is
now empty, which means the radio does nothing at all. Well it does, it sends out the number of channels that are
24