
User Manual
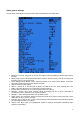

● Voice language: Allows you to choose the language of the voice announcements. Note that the list
contains all supported languages, but you also need to ensure a voice pack for that language has been
loaded onto the SD card (in a subfolder of the SOUNDS directory).
● Units: Allows choosing between metric and imperial units for telemetry values.
● FAI mode (if the "FAI choice" option is selected in OpenTX companion): Disables all telemetry displays
other than RSSI and voltage to comply with contest regulations. This is one-way, i.e. when you turn it on
with this menu option it can't be disabled anymore, you need to connect the radio to the PC and use
OpenTX companion to turn it off again (to prevent cheating). This allows you to come to the field, do
your checks / test flights with telemetry, and turn the restricted mode on before the beginning of the
contest on the radio itself.
● Default channel order: Defines the order of the 4 default mixers that are inserted on channels 1-4 when
creating a new model. Set this to your preference. They can of course always be moved later, this is
just a time-saving option.
● Mode: This is your stick mode, e.g. Mode 1 for throttle and aileron on the right stick, Mode 2 for throttle
and rudder on the left stick.
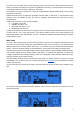
SD browser
A SHORT press of the PAGE key brings up the SD card browser page:
This allows you to browse the SD card contents.
On each file or folder, pressing ENTER will bring up a contextual menu with some basic file operations
(copy/delete), as well as others depending on the file type.
Folders are organised as such:
● BMP folder: This is where you should place the 64x32, 4-bit grayscale .bmp files that you want to use
as model logos. Filenames must be 10 chars long or less (not including extension). A collection of files
is available here. Placing the cursor over a valid file in this folder will show it on the right side of the
screen, and in the contextual menu you will find an entry to assign the selected image to the current
model.
● LOGS folder: This is where you will find telemetry logs if enabled. Files will be created with the same
name as the model they were saved from, with the date appended. One log file is created per day for
each model.
● MODELS folder: Model files saved by the "Archive model" command of the model selection screen will
be placed here. Similarly, models you want to reload using the "Restore model" of the same page need
to be placed there beforehand.
● SOUNDS folder: This is where voice packs need to be placed. ZIP files with the standard voice packs
can be downloaded from within OpenTX companion, or here. Extract the ZIP file to the root of the SD
card, and it will create the necessary subdirectories (e.g. SOUNDS/en for the English pack). Any file
you want to have available for the "Play Track" custom function needs to be placed within the
language's directory as well. In this folder, the contextual menu includes a preview function.
The microSD card can be formatted by selecting the relevant option in the menu that appears when pressing
MENU LONG. A confirmation will be required.
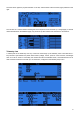
Trainer
A SHORT press of the PAGE key calls the trainer settings page:
10