
Installation Manual


4
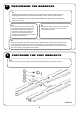
A)
The tent will be supplied with small runners (see image),
which slide within the tents track. Ensure that each tent
track has two of these. With your friend, lift the tent onto
the support brackets. Some tents are supplied with their
own fasteners. These are often not suitable to mount
using the Front Runner mount bracket, so extra bolts,
nuts and washers are supplied for this reason.
3
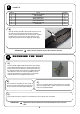
ITEM # Name Quantity
1 SUPPORT BRACKET 4
2 M8 WASHER 8
3 M8 X 16MM BOLT 8
4 M8 NYLOCK NUT 8
5 M8 X 25MM BOLT 4
6 TBMK006_011.PRT 4
7 SLAT.PRT 2
B)
Start by inserting the M8 x 16mm bolts into the T-slot in
the slat (See image). Slide the bolts to the position
where you have marked the slat. Fasten all four support
brackets using your 13 wrench. Hand tighten as you
might need to maneuver them slightly at a later stage.
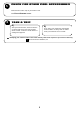
SECURING THE TENT
4
B)
Once the tent is in position, lift one corner of
the tent at a time and position the bolts from
the tent extrusion into the support brackets.
C)
Once you are happy with the tents position use a washer
(item 2 on page 2) and a nylock nut (Item 3) to fasten the
tent to the support brackets.
D)
Take a walk around the vehicle, to see whether the tent is square and centralized
IMPORTANT Make sure the brackets slope to the outside of the rack
IMPORTANT Tighten the bolts that fasten the tent mount brackets to the roof rack
slats
3
...CONT'D