
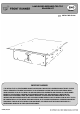
Installation Manual

4
INSTALLING DRAWER SYSTEM CONT...
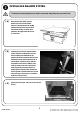
Using the drawer as a template, mark out the bottom ten
bolt holes with a white marker. For the front two holes
lift the carpet slightly. There is a hole in either corner of
the drawer base. (See picture to the right) For the rear
two, unlatch the Drawer and open it out partially. It may
be easier to mark these two holes by leaning over the
rear seats from the inside of the vehicle.
( D )
Remove the Drawer from the vehicle exposing the marks you have just made.
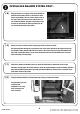
Drill 4mm pilot holes through the carpet and the floor of the vehicle. Now lift up the Carpet and open up
the Pilot Holes with a 9mm Drill Bit. Punch four holes in the carpet where you have just drilled the Pilot
holes, with a 20mm Hole Punch. Lay the carpet back down and insert the Clinch Nuts (Item 5) into the
holes in the body and crimp firmly.
( E )
( F )
Stack three 19x3mm Fat Washers (Item 4) on top of the Clinch Nuts to compensate for the carpet
thickness. Carefully place the Drawer System on top of the stacked Washers. Fasten the Drawer System in
place with the M6x25 Countersunk Cup Screws and M10 Flat Washers (Item3 &6). Use a 4mm Hex Key to
firmly fasten the four Cap Screws.
Finally fit the Deck with the Ten Countersunk Cap Screws you removed in Step2A.
( G )
Congratulations, you have
completed your
installation. Take a step
back and admire your
work. Good Job!
SSLD002_REV_A00