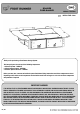
DRAWer FORD RANGER SSDS201 / SSFR001 INSTALL TIME: 1 Hour Thank you for purchasing a Front Runner Storage System. This Storage System is made up of the following components: 1. A Drawer System - SSDR010 2. A Deck Support System - SSWS001 3. A Vehicle Specific Deck Set - SSDS201 Before you start, take a moment to familiarize yourself with these Fitting Instructions and all the components received. Depending on the vehicle not all components received will be used.
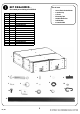
GET ORGANIZED... You will need: 10 mm Flat & Socket Wrench 4 mm Hex Key a Friend Measuring Tape Suitable Marker Pen Drill Machine 6.
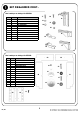
GET ORGANIZED CONT...
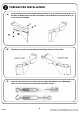
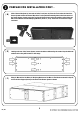
Prepare for installation (A) Loosely assemble the left and right hand Side Wing Sets (Items 24, 27) as shown below using two M6 x 16 Hex Bolts, two M6 Flat Washers, two M6 x 19 Flat Washers and two M6 Nyloc Nuts as shown (Items 19, 20, 21, 22) received with SSWS001. (B) Using Step 2A as a guide, loosely assemble the Corner Wings (Items 24, 25, 26) as shown. (C) Loosen the round end of the four Turn Buckles (Item 2) supplied with SSDR010.
Prepare for installation cont... (D) Slide a Channel Nut (Item 13) into each end of the Track (Item 16). Place the Track under the front of the Drawer System and line the Channel Nuts in the Track up with the mounting holes in the front corners of the Drawer System. Loosely secure the Track to the Drawer System using the two M8 x 16 Hex Bolts, two M8 x 25 Flat Washers and two M8 Springs Washers (Items 12, 14 15). Center the Track from left to right and fasten.
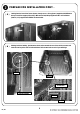
Prepare for installation cont... (G) Looking from the front of the Drawer System, loosely secure a D-ring (Item 4) supplied with SSDR010 to the top of each first support pillar using a M6 x 20 Hex Bolt, M6 Spring Nut and M6 x 19 Flat Washer (Items 5, 6 & 7) supplied with SSDR10 as shown below. (H) Working inside the loadbay, just below the wheel arches towards the rear of the vehicle, measure and mark the load bay either side as indicated below. Drill a 6.5mm hole on each of your markings.
Prepare for installation cont... (I) Secure the two D-rings (Item 33 received with SSDS201) to the inside of the vehicle's load bay. You will be bolting through the two 6.5 mm holes drilled in Step 2H using two M6 x 25 Hex Bolts, four M6 x 19 Flat Washers, two M10 x 50 Flat Washers and a two M6 Nyloc Nuts (Items 32, 34, 35, 36 received with SSDS201) as shown.
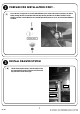
Install Drawer System cont... (B) Secure the Side Wing Assemblies from Step 2A to the Drawer System using six M6 x 20 Hex Bolts, six M6 Spring Washers and six M6 Flat Washers (Items 17, 18, 21) received with SSWO001. When securing the TOP of the MIDDLE Wing Assemblies, loosely secure a D-Ring (Item 4) to the Drawer and Wing Assembly using a M6 x 20 Hex Bolt, M6 Spring Washer and M6 x 19 Flat Washer (Items 5, 6, 7) recieved with SSWO008 as shown.
Install Drawer System cont... (D) Secure the middle D-ring mounts on the Drawer System to the D-rings fitted in Step 2I using a C-hook and Turn Buckle (Items 2, 11) each side. Secure the front D-Ring mounts to the tie down rings found at the rear of the vehicle using the remaining C-hooks and Turn Buckles. Ensure the Wing Nut goes towards the top of the Drawer System. When tightening the Turn Buckles ensure that the Drawer System remains centered left to right and 55 mm from the front.
Install Drawer System CONT... (G) Assemble the two Front Faces (Items 39, 40) to the front of the Drawer System using the four M6 x 16 Button Head Bolts (Items 41) supplied.
5 A 6 7 REV_A02 11
DRAWer 6 box large MKII FORD RANGER SSDS201 / SWFR001 INSTALL TIME: 1 Hour Thank you for purchasing a Front Runner Storage System. This Storage System is made up of the following components: 1. A Large Box Drawer System - SSWO008 2. A Deck Support System - SSWS001 3. A Vehicle Specific Deck Set - SSDS201 Before you start, take a moment to familiarize yourself with these Fitting Instructions and all the components received. Depending on the vehicle not all components received will be used.
GET ORGANIZED... You will need: 10 mm Flat & Socket Wrench 4 mm Hex Key a Friend Measuring Tape Suitable Marker Pen Drill Machine 6.
GET ORGANIZED CONT...
Prepare for installation cont... (A) Loosely assemble the left and right hand Side Wing Sets (Items 24, 27) as shown below using two M6 x 16 Hex Bolts, two M6 Flat Washers, two M6 x 19 Flat Washers and two M6 Nyloc Nuts as shown (Items 19, 20, 21, 22) received with SSWS001. (B) Using Step 2A as a guide, loosely assemble the Corner Wing Sets (Items 24, 25, 26) as shown. (C) Loosen the round end of the four Turn Buckles (Item 2) supplied with SSWO008.
Prepare for installation cont... (D) Slide the three Channel Nuts (Item 13) into the Track (Item 16). Place the Track under the front cross strap of the Drawer System. Line the three Channel Nuts inside the Track up with the mounting holes in the cross strap (as indicated by the arrows) and loosely secure the Track in position using the three M8 x 16 Hex Bolts, three M8 x 25 Flat Washers and three M8 Springs Washers (Items 12, 14, 15). Center the Track from left to right and fasten.
Prepare for installation cont... (G) Working inside the loadbay, just below the wheel arches towards the rear of the vehicle, measure and mark the load bay either side as indicated below. Drill a 6.5mm hole on each of your markings. 760 mm Outer Rib Place, Mark & Drill 6.5mm Hole Edge of Load Bay 130 mm Outer Rib (H) REV_A02 Secure the two D-rings (Item 33 received with SSDS201) to the inside of the vehicle's load bay. You will be bolting through the two 6.
Install DrawER System (A) Lift the Drawer System (Item 1) into the vehicle's load bay and position it 60 mm in from the front of the load bay and center it from left to right. 60 mm Load Bay Tail Gate (B) Secure the bottom of the Side Wing Assemblies from Step 2A to the Drawer System using four M6 x 20 Hex Bolts, four M6 Spring Washers and four M6 Flat Washers (Items 17, 18, 21) received with SSWO001.
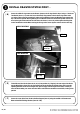
Install Drawer System cont... (C) Position the Corner Wing Assemblies from Step 2B over the corners of the Drawer as shown. Secure the Assemblies to the Drawer using the remaining M6 x 20 Hex Bolts, M6 x 19 Flat Washers and M6 Spring Washers. (D) Secure the middle D-ring mounts on the Drawer System to the D-rings fitted in Step 2H using a 60 mm Chook and Turn Buckle (Items 2, 11) each side.
Install Drawer System CONT... (E) Fit the Side and Rear Decks (Items 28, 29, 30, 31) into position, by "clipping" the outer edge of the Decks into the Wing Sliders (Item 24 & 26) and pushing the Decks towards the outside of the vehicle, thereby adjusting the Slider to the correct length. Once you are happy with the length of the Slider, carefully remove the Decks taking care not to move the Sliders and fasten the two bolts on each Slider, locking it into position.
5 A 6 7 10 REV_A02