
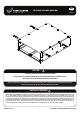
Installation Manual

3
SSAM008_REV_A00
© COPYRIGHT 2017 FRONT RUNNER VEHICLE OUTFITTERS
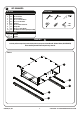
FIT AND SECURE
2
2.1
2.2
FITMENT WITHOUT MOUNTING KIT
Place the Drawer (Item 1) in the vehicle
and position it. Make sure the Drawer
opens & closes freely without touching
the plastic trim on the trunk floor.
Once the Drawer (Item 1) is in position,
mark the four mounting hole positions.
Remove the Drawer and check for
clearance on all marked holes, above &
below the mounting surface. Start with a
4mm drill bit and drill pilot holes. Finally
use the 6.5mm drill bit and redrill holes.
Use anti-rust on all holes drilled.
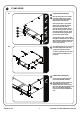
Secure the Drawer (Item 1) to the vehicle
using M6 x 30 Hex Bolts, M6 x19 x 1SS Flat
Washers, M6 Spring Washer and M6 rivnut
(Item 2,3,4 & 6) as shown. Use silicon to
create a water proof seal.
FITMENT USING A MOUNTING KIT
Use the hardware & fitting instructions
received with (SSCA020 / SSCA021)
After fitting the mounting kit slide three
M8 Channel Nuts into each of the
Aluminium Extrusions. Secure using the
M8 x 25 Hex Bolts, M8 Spring Washers and
M8 x 25 x 2 Flat Washers through the
Drawer base frame into the M8 Channel
nuts.
3
2
4
10MM
4MM
6.5MM
6
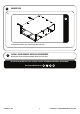
Once the Drawer (Item 1) is secure you can
now add the Side Brackets (Item 10) by
sloting them into postion as shown.
The Drawer system does not come with a
vehicle specific deck completion set or
face plates.
13MM