
Installation Manual


20
18
RRAC171_REV_A00
© 2020 FRONT RUNNER VEHICLE OUTFITTERS
5
FIT AND SECURE 2
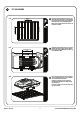
2.7
2.8
2.9
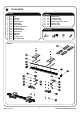
The use of the Box Brackets (Item 19 & 20)
are dependant on the cargo box model, and
bottom profile.
For the purpose of this fitment guide the
Narrow Box Brackets (Item 20) will be used.
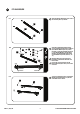
Remove the backing tape of the Self
Adhesive Rubber Strips (Item 18) and secure
it to the four Narrow Box Brackets (Item 20)
as shown.
Loosely assemble the two assembled Slats
inserting the M8x35 Hex Head Bolts (Item
16) through the bottom cargo box mounting
slots, using the four Narrow Top Brackets,
four M8 Flat Washers and four M8 Nyloc
Nuts (Item 20, 5 & 11).
The orientation and hole usage of the
Narrow Box Brackets (Item 20) are model
dependant.
Take note of the Release Bracket (Item 4
& 15) orientation before assembling to the
bottom of the cargo box.
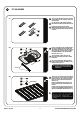
Taking into account the length and width of
your cargo box, choose where you'd like to
position it on the rack. This will determine
where you need to fit the Catch Brackets
(Item 8 & 10).
Slide four M8x20 Bolts (Item 9) into each
relevant slat using the machined holes in
the slat.
Loosely fit the Catch Brackets (Item 8 & 10)
to the rack using M8x20 Hex Bolts, M8 Flat
Washers and M8 Nyloc Nuts (Item 9, 5 & 11).
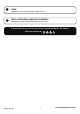
Orientation
Front of Cargo Box
11
5
20
11
5
8
9
10
8
10
Rear of Rack
Note the position of the Catch Brackets
and the Latch orientation. Make sure
that the Closed Side of the Catch
Brackets are facing toward the front of
the rack.
13mm
13mm
Closed Side
Tip: Open Box and stand vertically on
suitable surface while fitting Slat
and Bracket.