
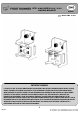
Installation Manual

4
()
E
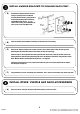
Install Awning Brackets to slimline ii RACK CONT...
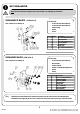
Install Awning brackets to slimline Rack
()
a
Decide which side of the Slimline Rack you would like to install the Awning.
On the chosen side, place the two Awning Brackets (Item 2) on either end of the Rack. The Brackets must
sit between two slats. Using a scriber, mark the position of the holes, as indicated by the arrows, onto the
Rack and remove the Brackets.
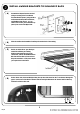
Measure the distance between the centers of the two Slats from Step 2D and space the Mounting Bracket
Assemblies fitted to the awning in Step 2B accordingly.
With the help of a friend, position the awning onto the side of the Rack. Working from underneath,
position the Awning Brackets so that the mounting slot in the bottom of the Awning Bracket lines up with
the bolt hole from Step 2A. Secure the Brackets to the Rack using the two M8 x 30 Button Head Bolts and
two M8 Flat Washers (Items 4 & 7) supplied.
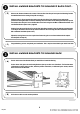
Working from the top of the Rack, line up the four Nyloc Nuts inserted in Step 2D with the mounting holes
in the top of the Bracket. Secure the top of the Brackets to the Rack using four M8 Flat Washers and four
M8 x 25 Button Head Bolts (Items 3 & 4).
Adjust the awning front to back as required and fasten the grub screw found underneath the adapter
bracket (Refer to Step 2A).
REV_A01
Congratulations, you have completed your installation. Take a step back and admire your work. Good Job!
(
F
)
Drill a 6.5 mm hole on each marked positions.
(
b
)