
Installation Manual

RRAC036_REV _A02
© 2020 FRONT RUNNER VEHICLE OUTFITTERS
4
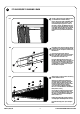
FIT AND SECURE TO SLIMLINE RACK 3
3.1
3.2
3.3
Decide which side of the Slimline Rack you
would like to install the awning.
On the chosen side,Place two Awning
Brackets (Item 1) on either end of the
Rack. The Brackets must sit between two
slats. Place the third Bracket in the center.
Ensure that the two holes in the Bracket
are at the top. Using a white marking pen,
mark the position of the holes as indicated
by the arrows, onto the Rack and remove
the Brackets.
Drill a 6.5mm hole on each of the marks
made in 2.1.
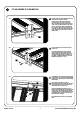
Place the awning brackets back on the
Rack, aligning the holes in the Bracket
with the holes you just drilled. Secure the
Brackets to the Rack using nine M6 x 16
Hex Bolts, nine M6 Flat Washers and nine
M6 Nyloc Nuts (Items 3, 5 & 6)
Depending on the extrusion that the awning
is mounted to, you will use either M6 or M8
fasteners. For this example we will be using
M8 fasteners.
On the back of the awning, slide six
M8 x 20 Hex Bolts (Item 4) into the extrusion,
three Hex Bolts in the top slot and three in
the bottom slots as shown in 2.2.
Place the Awning Brackets (Item 1) over
the M8 x 20 Hex Bolts (two per bracket) and
loosely secure the Brackets to the awning
using six M8 x 16 x 1.6SS Flat Washers and
six M8 Nyloc Nuts (Items 8 & 9) and space
the Brackets as required.
Place M8 Nut Cups (Item 10) on the Nyloc
Nuts.
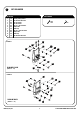
1
3
5
6
8
9
4