
Installation Manual


5
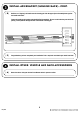
Loosen the Top Spacer Assembly so that
it is able to move up and down. Slide the
axe through and into the Head Bracket.
This will allow you to see where to
position the Handle Bracket.
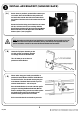
Decide where on your Rack you would like to mount your
axe bracket. Place the Head Bracket into position over
the Side Profile with the short side to the bottom. Mark
the position of the three holes in the bracket onto the side
profile.
Remove the Bracket. Using your drill machine and a 6mm
drill bit, drill three holes on your markings. Refit the
Head Bracket and fasten it to the Rack using three M6x12
Button head Bolts, three M6 Nyloc Nuts and six M6 Flat
Washers (Items 7, 9 &11) supplied.
(
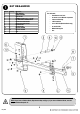
INSTALL AXE BRACKET SLIMLINE
)
RACK
()
A
NOTE: Depending on which side of your Head Bracket you would like the axe handle to exit, you
may need to move the two Spacer Assemblies (one top, one bottom) to the opposite side. The
spacer assemblies must be on the same side that the handle exits the bracket.
()
B
(
C
)
Choose where along your handle you would like to
position the Handle Bracket. Slide the Handle Bracket
over the Side Profile. The side with the long slot goes
to the bottom of the Rack. Mark and drill as you did
with the Handle Bracket. - refer to Step 2A.
Once the Handle Bracket is secured to the side profile
(using the remaining M6 Button Head Bolts, M6 Flat
Washers and Nyloc Nuts), push the axe handle against
the Handle Bracket and mark the position of the
threaded locating pin onto the axe's handle.
Drill a 12mm hole into the axe handle on your mark.
REV_B00