
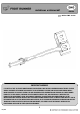
Installation Manual


4
()
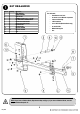
INSTALL AXE BRACKETS SLIMLINE II RACK
()
D
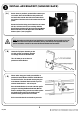
The Handle Bracket mounts in-between two slats and locates in-line with the hole in the bottom of the
side profile as indicated by the arrows. Slide the Handle Bracket between the remaining two bolts from
Step 2A &B.
Choose a suitable position to mount the Handle Bracket (You may need to move the Head Bracket). Fasten
the Handle Bracket to the Rack using a M8x20 Button Head Bolt, M8 Flat Washer and M8 Nyloc Nut (Items
6, 8 &10) for the bottom mounting. Fasten the two top Button Heads.
Push the axe handle against the Handle Bracket and mark the position of the threaded locating pin onto
the axe's handle. Remove the axe and drill a 12mm hole through the handle on your mark.
()
E
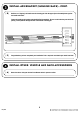
Refit the axe "clipping" the handle over the locating pin in the handle bracket. Pull the Axe Head Bracket
away from the Handle Bracket so that it fits snugly against the axe head. Tighten the two Button Head
Bolts securing the Head Bracket to the Rack. Push the upper Spacer Assembly down against the handle
and fasten. Check that the handle is able to "clip off" the locating pin. Adjust either of the two brackets if
needed until the handle is able to unclip.
Fasten the handle to the bracket using the M10 Eye Nut supplied. The axe can be locked to your vehicle be
placing a small padlock through the hole in the handle's locating pin.
Congratulations, you have completed your installation. Take a step back and admire your work. Good Job!
()
F
REV_B00