
Installation Manual

© 2022 FRONT RUNNER VEHICLE OUTFITTERS
4
KSSX001_REV_A01
FIT AND SECURE
2
2.4
2.5
2.6
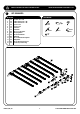
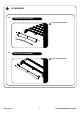
Assemble seven Narrow Slats (Item 15) to
assembly 2.3 using M6 x 25 Thread Forming
Screws (Item 14).
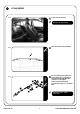
Apply a bead of sealant on the six Nut Plates
(Items 6 & 7), and secure the Slimsport Roof
Rack to the Nut assemblys as shown in Step
2.6. This will allow easy removal of the rack
in the future.
Refer to Fig 1.1 for positioning.
NOTE: Do not fit the front slat yet.
Use a little oil on screw threads before
inserting. Note these are Thread
Forming Screws.
Torx
T30
Cordless
Drill
Inside
14
15
Roof
11
10
9
8
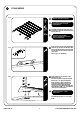
Tightening Torque 8-10Nm /
5.9 ft lb - 7.38 ft lb. Take care when
using a cordless driver.
10mm
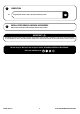
Apply Sealant over the 12 holes on the
outside of the roof.
Place Spacers (Items 4 & 5) over the holes.
Refer to Fig 1.1 for Spacers positioning.
Apply a bead of sealant on the threads
of the M6 x 50 Hex Bolts and secure the
Slimsport Roof Rack to the Nut Plates
inserted in 2.7 using M6 x 50 Hex Bolts, M6
Spring Washers & M6 x 19 x 1 Flat Washers
(Items 8, 9 & 10). Fully tighten.
Place M6 Nut Caps (Item 11) over all Hex
Bolts.
Tightening Torque 9 - 11 Nm /
6.6 - 8.1 ft lb