
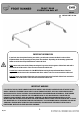
Installation Manual

2
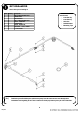
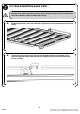
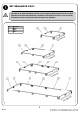
The Illustrations on Page 3, show how the various components fit together and how your Expedition Rail
will look depending on the width and length of your Rack. Refer for Appendix A to see which components
will be used for your Rack.
If your Rack is 14 Slats or 2 772 mm Long, please refer to Page 7
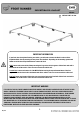
GET ORGANIZED
REV_A02
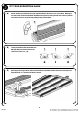
Familiarize yourself with the parts and then step away from the work area and read through these
instructions from beginning to end. Take a moment as a little prep now may save you a lot of time later.
()
B
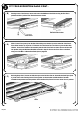
You will need:
4 mm Hex Key
5 mm Hex Key
Hack Saw
Suitable Marker
Measuring Tape
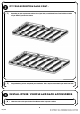
Here is what you are looking at:
Item # Quantity Description
1 4 PIPE A *
2 4 PIPE B *
3 4 PIPE C - 700 mm LONG
4 8 JOINER PIECE
5 4 CORNER PIECE
6 8 M8 x 25 BUTTON HEAD BOLT
7 4 M6 x 12 BUTTON HEAD BOLT
8 8 M8 NYLOC NUT
9 16 C-CLIP SPACER
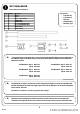
* The lengths of Pipe A and Pipe B (Item 1 & 2) received in your Expedition Rail Kit will vary depending on
the width and length of your Rack. Below are the various Rack widths and lengths of the two Pipes you
should have received.
1165 Wide Rack: Pipe A - 480.5 mm 1425 Wide Rack: Pipe A - 610.5 mm
Pipe B - 365.5 mm Pipe B - 570.5 mm
1255 Wide Rack: Pipe A - 525.5 mm 1475 Wide Rack: Pipe A - 480.5 mm
Pipe B - 365.5 mm Pipe B - 570.5 mm
1345 Wide Rack: Pipe A - 570.5 mm
Pipe B - 570.5 mm
()
A
(
C
)