
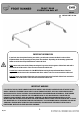
Installation Manual

4
( )
E
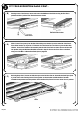
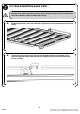
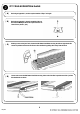
Slide a Corner Piece (Item 6) into the Rear Slat making sure that the Lip on the underside of the Corner
Piece slides into the Top Lip of the "U" Channel. Once the Corner Piece is all the way into the Rear Slat,
slide the Corner Piece and Rear Slat assembly onto the side of the Rack as shown. Secure the Rear Slat
into position using the M8 Button Head Bolt removed in Step 2D. Secure the Corner Piece to the Rack
using one of the M6 x 12 Button Head Bolts (Item 4) supplied.
REV_A01
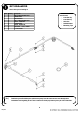
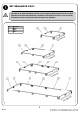
FIT YOUR EXPEDITION RAILS Cont...
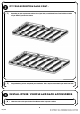
Starting on one of the Corners, loosen and remove the M8 Button Head Bolt securing the End Slat in
position and slide / pull the Rear Slat backwards as shown.
( )
D
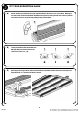
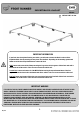
Referring Steps 2D & E, loosen and slide the open end of the Rear Slat out. Assemble the Steel Pipes (Item
5), Joiner Piece and remaining Corner Piece together as shown below and slide the Rear Slat with
assembled components back into position. Secure the Rear Slat, Corner Piece and Joiner Piece in position.
( )
F