
Installation Manual

6
REV_A0
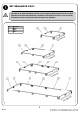
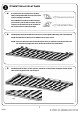
FIT YOUR EXPEDITION RAILS Cont...
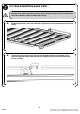
Assemble two Pipe A's (Item 1), one Joiner Piece and one Corner Piece together as shown below. Loosely
secure the Corner Piece in position and slide the Rear Slat with assembled components back into position
and secure the Rear Slat to the Rack using the M8 x 25 Button Head Bolts removed in Step 2D.
()
G
(
J
)
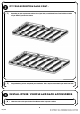
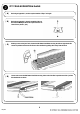
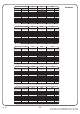
Referring to Page 3 and Appendix A, assemble the required number of Pipes B, Pipes C and Joiner Pieces
together as shown.
(
K
)
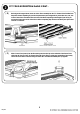
Slide and fit the Slat assembly from Step 2H back into position and secure in place using the M8 x 25
Button Head Bolts removed in Step 2H.
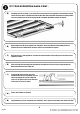
Congratulations, you have completed your installation. Take a step back and admire your work. Good Job!
(
N
)
(
H
)
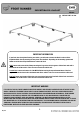
Repeat Steps 2C to 2G on the opposite side of the Rack, but do not slide the Slat Assembly back into
position and secure. Remember to insert the Joiner Piece assemblies if required.
Ensure that all Bolts are fastened.
(
M
)
(
L
)
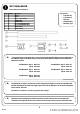
If some of the Pipes are loose once your
Expedition Rail has been assembled, you can
loosen the appropriate section of Pipe and
insert a C-clip Spacer (Item 9) over the taper
of the Joiner or Corner as shown.