
Installation Manual

© 2021 FRONT RUNNER VEHICLE OUTFITTERS
5
KRVA002T_REV_A00
COMPLETION
4
4.1
Congratulations! You did it. Take a step back and admire your work!
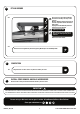
INSTALL OTHER VEHICLE AND RACK ACCESSORIES
5
Now's the time to visit your favorite Front Runner Dealer in person or online.
IMPORTANT!
Be sure to tag us. We love to see our gear in action! #FrontRunnerOutfitters #BornToRoam
Share your adventures on:
FRONT RUNNER RACK KITS OFTEN HAVE A HIGHER LOAD RATING THAN THE VEHICLES THEY ARE MOUNTED TO. PLEASE REFER TO YOUR SPECIFIC VEHICLE MANUFACTURER
FOR A RECOMMENDED ROOF RATING. FRONT RUNNER CANNOT BE RESPONSIBLE FOR IMPROPER LOADING BEYOND THE VEHICLE MANUFACTURER'S STATED LOAD CAPACITY.
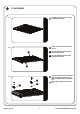
150mm
FIT AND SECURE
3
2.2
3.2
3.3
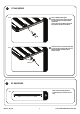
Center the rack and tighten fully. Finish off by placing M8 Nut Caps over the M8 Nyloc Nuts.
13mm
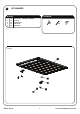
Place your Tray on the vehicle positioning
all the feet so that they rest on top of the
roof rails.
Measure 150mm on the front of the roof rail
as shown and position the LH and RH front
Grab On Feet.
Fully tighten all the M6x50 Cap Screws to
secure the Tray onto the rails.
Refit the Front Cover Plates.
3mm
5mm
Tightening Torque 6Nm
Make sure there are no movement on
the rack after fully tightening all the
fasteners.