
Installation Manual

3
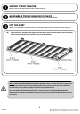
MOUNT THE RACK TO YOUR VEHICLE
(Refer to Foot Assembly Instruction Document FASSUNI)
()
A
Insert the required Bottom Feet into each Track and space according to the distances between the Top
Feet fitted to the Rack in Step 3 (Document FASSUNI).
Grab your friend and with one of you on each side of the Rack, flip the rack end over end (Prevents the
Hex Bolts from falling out the machines slots) so that the Feet are facing down. Approach the vehicle from
the rear, lifting the Rack up and over the roof.
Position the Rack as far back as possible without it overhanging the rear of the vehicle and ensure that
the rear door is able to open fully without hitting the rack or accessories. Bring the rack down slowly
lining up the Top and Bottom Feet and loosely fasten.
Center the Rack left to right. Ensure that the Rack is level - front to back and left to right - before
tightening.
REV_A00
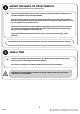
TAKE A TRIP
After your first adventure, check that all nuts, bolts, screws and fittings are tight. Re-tighten where
needed. You'll find a small amount of settling has happened.
Go on many more adventures, periodically checking all nuts, bolts, screws and fittings.
()
A
Front Runner can not recommend a maximum load carrying capacity. Please refer to your vehicle
manufacturer's recommendations.
Congratulations, you have completed your installation. Take a step back and admire your work. Good Job!