
Installation Manual

11
18
19
© 2019 FRONT RUNNER VEHICLE OUTFITTERS
3
FAFF003_REV_A00
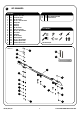
FIT AND SECURE FOOT RAIL 1999 - 2017 F250 / F350
2
2.1
2.2
2.3
Measure 270mm from the top edge of the
windshield and make a mark in the center
of the ditch.
Position the Foot Rail in the ditch. Align the
front mount hole in the Foot Rail with the mark
made earlier and mark the remaining five
holes.
Remove the Foot Rail from the vehicle. Drill a
6.5mm pilot hole in the center of the markings.
Open the holes using a 12mm Drill.
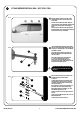
Insert the M6 Button Head Bolt (Item 18)into
the one side of the Installer Wrench (Item 19).
Loosely fit a Jack Nut (Item 11) to the Button
Head Bolt as shown.
Using the Installer Wrench and a M6 x 30
Button Head Bolt, insert the M6 Jack Nuts
into all 12 holes.
Place the assembly into a hole drilled in
2.1. Using a Battery Powered Screw
Driver and a 4mm Allen Key Bit, set the
Jack Nut into the hole while holding onto the
handle of the Installer Wrench.
Make sure that the Jack Nut has pulled
up all the way to the inside skin of the
roof panel.
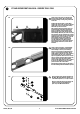
Place a bead of silicone around each of the
Jack Nut openings inserted earlier
in Step 2.3.
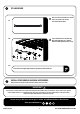
To fit the Foot Rails (Item 1LH & 1RH), place
the 6mm Plastic Spacers (Item 2) over the
Jack Nuts inserted in Step 2.2, followed by
the Foot Rail (Item 1).
Place silicone on the threads of the M6 x 40
Hex Bolts and secure the Foot Rail using
M6 SS Spring Washers and M6 x 19 x 1SS
Flat Washers (Items 8, 9 & 10).
Do this on both the left and right side of the
vehicle.
Finish by placing M6 Nut Caps (Item 7) on the
M6 Hex Bolt heads.
To fit the Rack, proceed to Step 4.
10
9
8
2
11
7