Operating Manual Translation of the original FRITSCH PELLET PRESS
TABLET PRESS
PELLET PRESS Fritsch GmbH Milling and Sizing Industriestraße 8 D - 55743 Idar-Oberstein Phone: +49 (0)6784/ 70-0 Fax +49 (0)6784/ 70-11 E-Mail: info@fritsch.de URL: http://www.fritsch.de Fritsch GmbH, has been certified by the TÜV-Zertifizierungsgemeinschaft e.V. Certificate registration number 71 100 J 596. It was verified through an audit that Fritsch GmbH satisfies the requirements of DIN EN ISO 9001:2008.
PELLET PRESS Table of contents 1 1.1 1.2 1.2.1 1.2.2 1.2.3 1.2.4 1.2.5 1.3 1.4 1.5 1.6 1.7 1.8 Page Safety Instructions and Proper Use....................................................4 Requirements on the Operator ..................................................................... 4 Proper Use .................................................................................................... 4 Press setup..............................................................................................
TABLET PRESS 1 Safety Instructions and Proper Use 1.1 Requirements on the Operator This operating manual is intended for persons who are assigned the operation and supervision of the Pellet Press. Persons under the influence of health impairments, medications, drugs, alcohol or excessive fatigue may not operate the instrument. The instrument may only be operated by authorised persons and may only be maintained and repaired by trained experts.
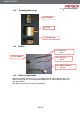
TABLET PRESS 1.2.2 Pressing tool set up (10) Plunger (11) Die (12) Bottom tool 1.2.3 Toolkit (14) Allen key size 5 (13) Oil dipstick (15) Allen key size 4 (16) Socket spanner, size 15 1.2.4 Fields of application Manual hydraulic Pellet Press for the preparation of solid samples for X-ray fluorescence analysis or infrared spectroscopy for the manufacture of pellets of high permeability. The device may only be used for this purpose.
TABLET PRESS 1.2.5 Method of operation The pellet press is a manually-operated hydraulic press. The device is fitted with a piston pump. This has a suction and pressure valve, a pressure limiting and stop valve. The pressure limiting valve is set for a maximum oil pressure of 350 bar, and may not be adjusted. The stop valve must be closed before the pressing process. The hydraulic oil is kept in an oil reservoir. This is closed off using a locking screw (9) with an integrated vent screw.
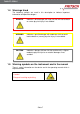
TABLET PRESS 1.4 Warnings Used The following symbols are used in this description to indicate important information and possible dangers. DANGER Indicates a direct danger with high risk that will lead to death or severe physical injury if not avoided. WARNING Indicates a possible danger with moderate risk that could lead to death or (severe) physical injury if not avoided.
TABLET PRESS 1.6 Instrument Safety Notices Only use original accessories and original spare parts. Failure to adhere to this may jeopardise the protection of the machine. Care must be taken during all work to prevent accidents. The machine should be operated indoors only. The ambient air should not contain any electrically conductive dust particles. DANGER When pressing pressure-sensitive substances, there is a danger of spontaneous combustion.
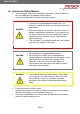
TABLET PRESS 1.7 Protective devices NOTE Protective devices should be used for the intended purpose and must not be made unserviceable or removed. All protective devices must be regularly inspected for completeness and proper function. An overpressure valve is used to prevent the pressure from becoming too high. It opens when the pressure exceeds 350 bar. 1.8 Danger points CAUTION Crushing Danger! During pressing procedure. Do not put your hands between the pressing tool and spindle.
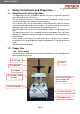
TABLET PRESS 3 Installation 3.1 Transport The Pellet Press will be delivered on a transportable pallet with a wooden hood. For the transport of the still boxed instrument we recommend a fork lift or a hand pallet truck. 3.2 Unpacking Open the packaging bandages. Remove the cover from the box. Remove the accessories. You can now lift the device off the pallet. The device must be transported in a standing position. It may not be tilted, impacted or thrown.
TABLET PRESS Now place the lever (1) onto the pump axle and fix using an Allen key size 4 (15). The position of the lever (1) can be adjusted as required. It can be adapted to suit the operator. Remove the plastic ring from the locking screw (9) and turn the integrated vendor screw through 1.5 revolutions by hand. This allows air to enter the oil reservoir, which prevents a vacuum being created inside.
TABLET PRESS Place the pressure plate (6a) into the centre of the press on the pressure cylinder piston (6). The lever (8) on the stop valve can be adjusted in its position as required. To do this, simply pull it forwards and rotate it into the required position. Please retain the transport packaging so that you can use it if you ever need to return the device. Fritsch GmbH is not liable for any damages caused by incorrect packaging (non-original packaging). 3.
TABLET PRESS 3.5 First function test CAUTION Never use the the pressing tool without sample material. This will result in damage to the pressing tool. No guarantee claims will be accepted in this case. 1. 2. 3. 4. 5. 6. Before carrying out the first pressing attempt, the lever (8) on the stop valve must be rotated in a clockwise direction to "close" so that pressure can be built up. Put the pressing tool together with a suitable test material as described in Chapter 4.2.
TABLET PRESS 4 Working with the Pellet Press Only start to operate the device once all work described in Chapter 3 has been carried out! 4.1 Sample preparation The sample must have a fineness suitable for the material. If necessary, you should carry out test pressings. In the case of some materials, especially very hard materials, the sample must be mixed with "washing powder" as a binder before pressing. The mixing ratio is 1 part washing powder to 4 parts sample material.
TABLET PRESS 5. Push the pressure plunger (10) into the die (11). CAUTION Crushing Danger! Due to the extremely tight tolerances the parts can cant in this situation. 6. Now compress the sample by hand by pushing the pressure plunger (10) in the die (11) downwards towards the bottom tool (12). The air contained inside will escape out of the venting hole provided in the die (11). 7. The pressure tool with sample is now ready to be placed in the press.
TABLET PRESS 4.3 Pressing procedure 1. Turn the stop valve lever (8) in a clockwise direction to "close". close 2. 3. 4. open Rotate the spindle (4) upwards using the hand wheel (3). Open the door (5) to the workspace. Place the ready-filled pressing tool together with the bottom tool (12) in the centre of the press on the pressure cylinder piston (6) pressure plate (6a).
TABLET PRESS 5. Clamp the pressing tool by screwing the spindle (4) down. The threaded spindle (4) presses onto the pressing tool plunger (10). CAUTION Crushing Danger! Do not place your finger between the threaded spindle and the pressing tool. 6. 7. Close the door. Move the lever (1) backwards and forwards the pressure cylinder piston (6) will be "pumped" upwards. After around 20 strokes, a pressure buildup will be visible on the pressure gauge (7).
TABLET PRESS After this, open the stop valve using the lever (8). Turn it to "open" the pressure cylinder piston (6) will now move slowly downwards. Stop lowering the pressure plunger approximately 2 mm before bottom dead centre . This saves part of the pumping process during the next working cycle. close open 2mm 9. Unscrew the spindle (4) 10. Remove the pressing tool. 11. Raise the bottom tool (12) off the die (11). 12.
TABLET PRESS 13. Place the closed pressure tool on the pressure cylinder piston (6) pressure plate (6a) again. 14. Press it onto the pressing tool plunger (10) using the spindle (4). Press the Pellet pellet out of the die (11) into the bottom tool receptacle (12) provided for this purpose. CAUTION Crushing Danger! Do not place your finger between the threaded spindle and the pressing tool. 15. Rotate the spindle (4) upwards. 16. Remove the pressing tool, pull the plunger (10) out and raise the die (11) .
TABLET PRESS 5 Accessories Pressing tool for pellets of 32 mm diameter. 6 Cleaning Use a moist cloth to rub the device clean. If necessary, the pressing tool may be placed under running water and brushed clean with standard detergents. After this process it must be dried thoroughly so that the press material does not adhere. 7 Maintenance CAUTION Signalize maintenance work with a warning sign. The Pellet Press has been vented at the works.
TABLET PRESS 1. To check the oil level, lift the pressure plate (6a) off the pressure cylinder piston (6) and then remove the plastic ring which protects the locking screw (9). The locking screw (9) is then accessible. 2. Close the locking screw (9) venting knob off by hand. 3. After this unscrew the locking screw (9) with the socket spanner supplied (16) and screw it out.
TABLET PRESS 4. Insert the oil dipstick supplied (13) into the opening and press it into the drillhole with a little pressure. It must be positioned correctly. 5. Pull the oil dipstick (13) out. Now check the oil level against the marking located on the middle of the dipstick. 6. If the oil level does not come up to the top of the area marked on the dipstick, standard hydraulic oil (for example Hipol 15 to PN Standard or Shell Tellus 37) must be refilled.
TABLET PRESS 9 Disclaimer Before using this product, these operating instructions are to be carefully read and be understood. Use of the product requires expertise and it is to be carried out only by commercial users. The product may be used exclusively for the applications outlined in these instructions and within the scope of the regulations set out in these operating instructions, and it shall be subject to regular maintenance.
TABLET PRESS Fritsch GmbH expressly disclaims every explicit or implied, contractual or arising from improper handling or a fixed contractual, statutorial or other liability, warranty or other obligation in respect of compensation obligations. Under no circumstances shall Fritsch GmbH accept liability, resp.
Tablettenpresse
Tablettenpresse
Seite 3