
Manual


10 Repairs
DANGER!
Mains voltage!
– Before beginning with repair work, unplug the mains
plug and protect the device against being unintention-
ally switched back on.
–
Indicate repair work with warning signs.
– Repair work may only be performed by specialised per-
sonnel.
– Put safety equipment back into operation after mainte-
nance work.
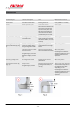
10.1 Checklist for troubleshooting
Fault description Cause Remedy
The POWER SUPPLY ready status
indicator doesn't light up
No mains connection Plug in mains plug.
Main switch (10) at 0 (OFF) Switch on main switch.
Excess current protection switch
has been triggered
Press the excess current protection switch
(9) on the back of the device.
"START" button is pressed but
mill does not start up
POWER SUPPLY does not light up see above
Pause time active Wait for end of pause or press "STOP".
Safety lock was opened manually Reactivate the safety lock, see
Ä
Chapter 2.6 ‘Protective equipment’
on page 14
Mill reduces speed automatically If REDUCED SPEED is lit: Overload Reduce load or accept automatically set
speed.
Mill stops running Switched off due to thermal over-
load of the drive
Allow device to cool down and select a
lower speed.
Imbalance of machine too high
Improve mass balance. (See
Ä
Chapter 6.6
‘Mass balance’ on page 37).
Drive was blocked Rectify malfunction in grinding chamber.
Motor's V-belt loose or ripped Check V-belt, replace if necessary.
Speed sensor is defective Contact customer service.
The hood cannot be opened. The hood handle (1) was not prop-
erly operated during opening.
Unlock the hood handle by pressing!
Repairs
- 55 -