Installation and User Guide fring version 5.x.x.
Table of Contents Table of Contents ............................................................................. 2 Introduction..................................................................................... 3 About fring ................................................................................... 3 System Requirements .................................................................... 4 Using fring.......................................................................................
Introduction About fring fring™ is a mobile internet service & community that enables you to interact with your friends on-the-go, including make free calls, group video calls, live chat with fring users, as well as other networks. Once you've installed fring, fring's main screen displays your friends and their presence status (e.g. online, offline). This list shows the names of your fringster friends and contacts from other networks.
System Requirements In order to use our version, you will need: Any iOS4 device (iTouch4, iPhone4, iPhone3Gs, or iPad), with iOS 4 or above installed on it. Internet connection (Not a WAP connection) on your iPhone. Download fring from this link: www.fring.com/iphone. Notes: 1. To initiate a call to a landline (or non-fring user) using fring, make sure to purchase SIP or fringOut credits. 2.
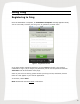
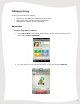
Using fring Registering to fring Once the installation is complete, an Installation Complete message appears briefly. You are now ready to select your fring user ID, password, and full name. Figure 2 - Registration Screen If you have already registered with fring, choose 'Login' and enter your existing credentials to log in (If you forgot your password you can use the password retrieval 'Click here' link at the bottom of the page.
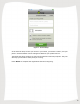
Figure 3 – Account Setup In the Account Setup screen you can fill in your Email, your Phone number, and your picture. All these details can be changed or added to your profile later on. The Email and phone number are required for password retrieval purposes. They will also help your friends to easily find you in fring. Press ‘Done’ to complete the registration and start using fring.
Calling in fring In fring you have three call options: Calling your fring/Add-on's contacts from My Friends. Calling your phone contacts from the My Friends. Calling phone numbers by using the Dialer. Voice calls To call a fring/Add-on contact: 1. Select My Friends in the bottom of the screen; choose a friend you wish to call and press the Green Call Button. Figure 4 – Initiate call 2. On your screen you can see the call screen. To end the call press End call.
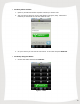
To call a phone contact: 1. Open My Friends and choose a phone contact you wish to call. 2. The next screen will give you the call options (fringOut \ SIP). Choose the method you would like to use and make the call. Figure 6 - Call Options Menu 3. On your screen you can see the call screen. To end the call press End call. To call by using the dialer: 1. Choose the dialer tab from the Tab Bar.
2. Click the flag icon and select the country you would like to call. Figure 8 – Choosing country 3. Dial the number and choose the method you would like to use to make the call (SIP/fringOut). 4. On your screen you can see the call screen. To end the call press End call. Note: To call phone numbers, you’ll need a SIP service, or fringOut credits. You can learn more about fringOut later in this guide.
Video calls fring's DVQ™ (dynamic video quality) technology adjusts to your mobile operator's bandwidth to give you the best video quality possible and ensure clear audio. That means that rather than getting a standardized, basic call quality, you get the optimized video call based on your particular bandwidth. Video calls are supported to fring contacts using fring on supported devices.
Group video calls With fring you’ll be able to video chat simultaneously with up to 3 fring contacts on supported devices. To initiate a video call open My Friends, choose the first fring contact you wish to call and press the Purple Group Video Button. Figure 11 – Initiate call Once the call has initiated, you’ll see a split screen with your camera’s output in the bottom left corner. Each buddy that answers the call will be added to the screen.
To add a friend to the call press the ‘+’ button in the bottom of the screen call. You’ll then be directed to My Friends, where you’ll be able to choose the contact you want to add to the group.
Receiving calls in fring fring allows you to both make and receive voice and video calls using your internet connection. To receive a fring call A call screen appears with the nickname of the caller. Press Accept.
Chatting in fring fring lets you chat with your contacts using instant messaging. You can chat with one or more of your contacts simultaneously. Figure 18 – Chat screen To initiate a chat: 1. From My Friends, select the contact you want to chat with and press the Yellow Chat Button. 2. In the text entry area, write your message and press the Blue envelope icon. To navigating between chats If you choose to have two or more chats simultaneously, each will have a separate tab.
Figure 19 – GoTo tab To end a chat: Press the Back button on the chat screen or go to the GoTo tab and press the Delete icon.
fringOut In addition to fring's free services of calling, video calling and chatting to other fringsters for free, fringOut lets users call friends not yet on fring for almost-free. fring users can call landlines and mobile phones from 1c/minute. Purchase fringOut credit To purchase fringOut credit, select the ‘fringOut’ icon at the top right hand side of fring's contact list. You can choose between a Pay as you go and a Monthly Subscription.
Options and settings Profiles and contact features Statuses The following statuses are displayed in My Friends: On a call Unread chat event Available / Online Busy N/A Offline Adding a new fring contact You can search for a fring contact by his fring user ID To search for a fring contact in the fring network: 1. From the Tabs bar choose More. 2. Choose the Add new friend option.
Your profile In fring you can edit and manage your profile. Figure 23 – Profile tab To access your profile in fring: Select the 'Profile' tab. To edit your profile: 1. Choose the 'Camera' icon to edit your profile picture. 2. Change your ‘Mood text’. 3. Choose your 'Full name' as it will appear in your friend’s fring. 4. Choose your International Phone Number and Email. The Email and phone number are required for password retrieval purposes.
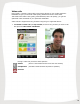
Contacts' profiles You can also view and manage your friends' profiles. You can see their details, their online/offline status and their current mood message. Figure 24 – User's profile To access a friend’s profile select a friend from My Friends. To rename the nickname of your friend, tap the nickname field.
History The history menu keeps a record of every incoming or outgoing voice event in fring. You can access it by selecting the ‘History’ tab. Figure 26 - History The icons on the left side represent the following events: Outgoing call Missed call Incoming call (blue up arrow) (red down arrow) (green down arrow) Note: If you have chosen to display your phone contacts in fring, voice events from your phone also appear in the history menu.
Searching My Friends You can browse My Friends to find friends quickly. To find a contact: 1. Choose the Magnifying glass icon on the top right corner of My Friends screen. 2. Start typing the name of your friend. The list is filtered according to the characters you have typed. Logging out of your fring account In fring you can log out of your account. To log out of your fring account: 1. From the Tabs bar choose More. 2. Choose the Log out option. 3. Read the message and select Log out.
Subscribing to your Add-ons Setting up Add-ons in fring enables you to connect with users from different networks (e.g., MSN Messenger, Gtalk, ICQ, SIP etc). Figure 28 –Add-ons menu To login to an Add-on: 1. Click on 'More', select 'Add-ons' and choose the service from the list, The following screen appears: Figure 29 – Subscribe to an Add-on The Add-on selection screen appears and you can see a green "V" sign which states the subscription was successful.
To login to a SIP service: 1. Click on 'More', select 'Add-ons' and choose 'SIP' from the list, The following screen appears: Figure 30 – Select SIP Service 2. Choose your SIP provider from the list. If your SIP provider is not listed, choose Other. Multitasking with fring Using the iPhone's iOS4 multitasking capability, fring can work in the background while you do other stuff with your device. When you would like to hide fring, press the Home button once.
While fring is hidden, when a contact will send you a chat message or try to call you, you'll receive these notifications: Figure 32 – Missed chat notification Figure 33 – Missed call notification If you choose View/Answer, fring will launch and you'll see the incoming chat message or will be able to answer the call (either audio or video call).
Address Book Options The address book settings allow you to control the look of your phone's address book appearance and utilization within fring's contact list. To control the appearance of your phone contacts in the list, Go to More > Add-ons > Address Book. Figure 34 – Address Book Options If Show phone contacts is set to Off, your phone contacts are currently hidden. To show them, choose On. If Find phone contacts option is enabled, fring will notify you when your phone contacts become fring users.
fring's settings There are several settings which can be altered in fring. To access fring settings: 1. On your Spring Board, select Settings. 2. From the list of applications choose fring.
Available settings 2. fring mood message – Once you're logged in with your MSN/Google talk on fring your mood message will be changed so your friends will know that you're on fring. You can disable this feature here. 3. fring signature – fring adds periodic signature to your MSN/Google talk messages to let your friends know that you're using your mobile on fring and therefore typing slowly. If you disable this here the signature will not appear.