
Instructions / Assembly

STEP 7
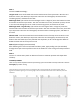
Insert the cords accordingly:
Longest Cord- Insert the knotted end into the bracket across from Eye Screw 2. Run the cord
down the screen, then back up to Eye Screw 2. Run the cord through Eye Screw 2 and the
remaining eyelets, and down to the cleat.
Mid-length Cord- (This will be the second longest cord in a large kit) Insert the knotted end into
the bracket across from Eye Screw 1. Run the cord down the screen, then back up to Eye Screw
1. Run the cord through Eye Screw 1 and the remaining eyelets, and down to the cleat.
Mid-length Cord – large kit only- (This will be the next longest cord in a large kit) Insert the
knotted end into the bracket across from Eye Screw 5. Run the cord down the screen, then back
up to Eye Screw 5. Run the cord through Eye Screw 5 and the remaining eyelets, and down to
the cleat.
Shortest Cord- Insert the knotted end into the bracket across from Eye Screw 3. Run the cord
down the screen, then back up to Eye Screw 3. Run the cord through Eye Screw 3 and 4, and
down to the cleat. With the screen pulled all the way down, tie all 3 cords together about 12’’
below the cleat and cut off any excess cord.
STEP 8 (Optional/Highly Recommended)
After fastening the screen to the header and door jambs, apply roofing nails (not included)
through the straps at the top of the screen to the header to create a long term and permanent
hold.
STEP 9
Insert a ¾” rod into sewn pouch on bottom of screen to maintain position and shape when
rolled up.
STORAGE/CLEANING
Take out any nails ad separate hook & loop fastening system. Wash with mild soap and water. Allow to
thoroughly dry before storing.
Consumer Warning: The Fresh Air Screen is not designed to be a security wall and will not prevent children, adults, or
aggressive animals from getting in or out of the garage or home. Visit www.freshairscreens.com for Warranty Terms and
Conditions.