
Operating and Maintenance Manual


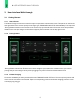
Table Of Contents

8
2 OPERATING THE BOOST CHARGER
2.4 Configure System Behavior
The site manager and/or station operator has the ability to customize a number of the Boost Charger
software features. These include:
• Setting pricing for electric vehicle (EV) drivers
• Set different pricing/access policies for different groups
To configure or make changes to settings at any time, log in to your EV Connect Administrator Portal by
visiting https://ops.evconnect.com/admin/login
For assistance with the Administrator Portal, please contact the EV Connect Site Host Support line by calling
(888) 780-0062.
2.4.1 User Interface Branding
The Boost Charger user interface (UI) has space available for custom branding, promotions, etc. Contact
FreeWire at marketing@freewiretech.com for more information.
2.5 Charging an EV
Pay, Plug, Go.
Step 1 Park vehicle as close as possible to available charge port. Connector type and location of charge
port varies by vehicle model. Refer to individual vehicle owner’s manual for specifications.
Step 2 Open vehicle charge port.
Step 3 Use the Boost Charger’s touchscreen to start charging. Select the plug on the screen that
corresponds to the port you wish to use. For an in-depth walk-through of the user interface, see
section 3.
Step 4 Complete payment prompts.
Step 5 Press the button on the selected connector handle to release cable from the holster.
Step 6 Plug in connector to vehicle charge port. Confirm cable is fully inserted. Charging will initiate once
connected.
Step 7 Tap ‘Stop Charging’ to end the charging session.
Step 8 Once charging has stopped, unplug vehicle by pressing the release button on the connector
handle.