
Operating and Maintenance Manual
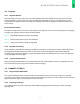
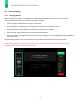
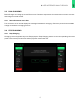
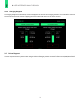
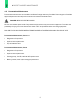

Table Of Contents

11
3 USER INTERFACE WALK-THROUGH
3.2 Payment
3.2.1 Payment Options
After selecting connector type, users can either (a) tap an EV Connect RFID card, if they have one, or (b)
insert/swipe/tap a credit card on the reader available directly below the screen. ‘Pricing Details’ can be
accessed on this page for more information on charging rates. This pricing table is also accessible on the
home screen.
No Touch Authorization
The Boost Charger uses EV Connect to allow drivers to easily find, access, and securely pay for EV charging.
To begin your charging session, follow the steps below:
Step 1 Download and launch the EV Connect app.
Step 2 Scan the QR code or type in the Station ID.
Step 3 Plug in your vehicle and tap ‘Charge Now’.
3.2.2 Payment Processing
Once payment is initiated, Boost Charger will display information on the payment status. Selecting ‘Cancel’
will stop payment authorization and return to the home screen. If the payment authorization fails, the
message “Error Auth Failed. Please try again” will appear. Select the desired port, then insert your payment
or tap your RFID card to try again.
2.2.3 Payment Authorization
When the payment authorization is successful a screen with, “Authorization success”, will appear, then the
screen will instruct you to plug in the vehicle to initiate charging.
3.3 CONNECT TO THE EV
3.3.1 Plug in Vehicle Notification
The screen will display which connector had been selected from the home screen. Plug in the selected
connector to the vehicle. If the wrong connector was selected, tap ‘Cancel’ to return to the home screen and
begin the process again by selecting the correct connector.
3.3.2 Preparing to Charge
The Charging Start Up screen should say “Please Wait! Charging Session Starting Up” above a flashing
lightning bolt.