
User Manual
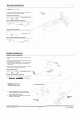
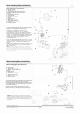

Main Wing Installation
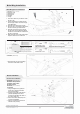
Main Wing Servo Installation
i
.
,
B
E
=
23.8mm
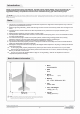
Note:
we have installed all the
servo boxes in the aircraft so that
when
the servo is removed,
it
will not
damage the foam surface.
If you need to
replace a servo, either purchase a
Freewing servo ,or refer to the
following drawing for dimensions to
ensure you have the correct size .
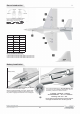
Aileron push rod size
(3.1 in)
Flap push rod size
(3.1 in)
C1/C2
Rebel 70 EDF Jet
-2-
Aileron pushrod mounting hole
: � A :
Flap pushrod mounting hole
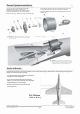
A- Screws(PWA1.7x5mm)
B- 9g servo cover
C- 9g servo box
D- Control horn
E- Pushrod
F- Trough
1. Use a servo tester or your radio to center
the servo arm.
2. Use the supplied glue to attach the "9g
servo box(C)" and the "Control horn (D)"
to the Main Wing.
3. Feed the servo wires into the Trough.
4. Fit the 9g servo covers (B)over the servos
and use 2 screws (A) to attach them.
5. Feed the open end of the push rod (E)
into the servo arm and adjus
t the length
so that the control surface is neutral when
the servo is centered.
6. When the push rod is at the proper length,
s
nap the clevis into the control horn.
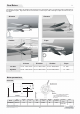
1. Place the main wing on the fuselage
and secure it with three screws.
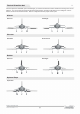
A. Screws (3xPA3*40)
A- Screws (PWA2x8mm)
B- Elevator drive pushrod
C- Elevator control horn
D- Control collars
E- Screws (PT1.7x10mm)
F- Pushrod
Elevator Servo Installation
Elevator Installation
1. Using the diagram as a guide,use
screws (A) to secure the elevator
servo to the fuselage.
2. Insert the open ends of the elevator
pushrods (B1&B2)into the servo
control horn and attach the clevis' to
the control collars (D).
3. Secure the control collars (D) to the
control horns (B1&B2).
4. Use the 4 screws (E) to secure the
elevator horns (C1&C2).