introduction Product basic information Package list PNP Assembly instructions install Fuselage install Horizontal Stabilizer install Vertical Stabilizer install Main Wing install other accessories install battery Push rod instructions Center of Gravity PNP Parameter sating Control direction test Dual rates The Elevator Center Position Pr-installed component overview Servo direction Motor specification BRAG TRAMCAR EAE PALE ERA H Hath SEAR SEEMS ERA iE [ie EAR hms sc Hi PNP BLA SE El EE AFTER FET EAE HE REAL
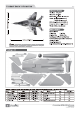
Freeing first established the Twin 80mm class of EDF jets with its popular F-14 Tom oat then A-10 Warthog, and now we are proud to announce the Freeing MiG-28 Fulcrum! Represented in 1/8 scale, this large aircraft ig 1878mm (747) long with a 1257mm (507) wingspan, powered by dual in funner 80mm EDF power systems Computer designed and hand crafted, hats Freeing MiG-29 represents the highest elev! of engineering for a modem Plug-And-Play EDF jet in 2020.
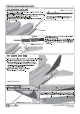
1. Apply glue evenly to the exposed carbon fiber tube surface of the front fuselage. 2. Apply glue evenly on the dark area of rear fuselage. 3. Closed the front/rear fuselage and wait for 30 minutes. After the glue is lacuna, proceed with the next assembly work. 4. Take out the plastic protective cover in the accessory bag. §. Use glue to glue theses plastic parts to the position shown in the figure. Ee.
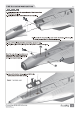
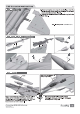
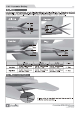
He ee a Screw ( Ptarmigan sped) 1. Tum over the fuselages, and let tha belly is up. Then begin to insist the fool-slgvator horizontal tail. instar the full-elevator rotating shaft int the dng hole, and fix & with screws. 3 Put the horizontal Tail which installed the signatory hom into When fixing the horizontal tall rotating shaft, make sure the rotating shale and fx It with the ding ring.
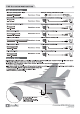
Hot : 2 When Inserting the main wing Into the fuselages, insert the a cable reserved on the side of the fussiness Into the main wing hub socket and then close it 3. Titan the screws attached to the main wing to fix the main wing. Anti-loosening screw : { Marxism dpe) Battery size: 85 5000mAL Battery weight :1420g Before connecting the battery and receiver, please We recommend the following Li Po battery: witch on the transmitter power and make sure $8 22.2V 4000mAh~5S 22.
mend pl After installed the plane, before flying, we need a fully charged battery and connect to the ESC, then use radio io test and check that every control surface work properly.
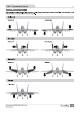
Bo According to our testing experiences, use ihs following parameters to set Aileron/Eisvator Rats. Program your preferred Exponential % in your radio transmitter. We recommend using High Rats for the first flight, and switching fo Low Rate if you dastards a lower sensitivity. On successive Rights, adjust the Rates and Expo to suit your preference.