
User Manual
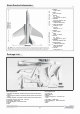

Elevator Installation
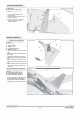
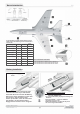
A- Metal collar
B- Full elevator rotating shaft
C- Screws (PM2x4mm 2pcs)
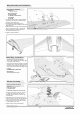
Rudder Assembly
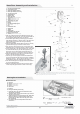
Rudder Servo Installation
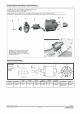
A- Screw
(PWA1.7x5mm)
B - 9g servo cover
C - 9g servo box
D - Surface control horn
E - Rudder push rod
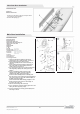
Vertical Stabilizers Installation
A-Screws (PA3x1Qmm 6pcs)
B -Fixed rudder plastic part (LF)
C -Fixed rudder plastic part (LR)
D -Fixed rudder plastic part (LL)
Super Scorpion
C
,/ A
�
_
D
-4-
1. Put the "Metal collar (A) into the
elevator groove.
2. Slide the elevator onto the "Elevator
rotational shaft (B)".
3. Use the " Screw (C)" to secure the
"Metal collar(A) to the "Elevator
rotational shaft (B)".
1.
Use a radio or
a servo tester
to center the
servo.
2.
Use the glue to
attach
the "9g ser
vo box
(C)" and the
"Rudder control horn (D)" to the rudder.
3.
Place the 9g servo into the "9g servo box
(C)".
4.
Place the "9g servo cover over the "9g
servo box and secure it using 2 "Screws
(A).
5.
Use the rudder control rod to connect the
"Surface control horn (D)" and the servo
control arm.
1. As shown in the photo to the right, secure
the vertical stabilizers to the fuselage
using the plastic reinforcement pieces
"(B), (C) and (D)", three screws per side.