
User Manual


Fuselage
A
sse
mb
l
y
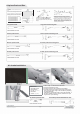
Refer to the photo on the right
1.Use a servo tester or radio to center
the servo.
2.Use glue to attach the "17g servo box
(
C
)" and "Aileron horn (D)" to the aileron.
3.Place the servo into the "17g servo
box(C)", and feed the servo cable into
the "Servo trough(F)", then position the
"17g servo cover(B)" and use 2
"Screws (A)" to secure it.
4.
Use the aileron pushrod to connect
the servo arm to the "Aileron horn(D)".
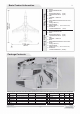
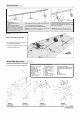
A- Carbon fiber tubes
B - Screw
(PWA3'8mm)
C - Main wing fixed plastic part F1
D - Main wing fixed plastic part B
E -Air intake cover
A
1.lnsert the "Carbon fiber tubes(A)" into
one side of the main wing.
2.
Slide the other main wing onto the
Carbon Fiber Tubes.
3.Thread "Screw(B)"in to the plastic bolt
to complete the main wing assembly.
4.lnsert the "Main wing plastic joiner
F1(C)" and "Main wing plastic joiner
B(D)"into the main wing.
5.Use glue to attach the "Air intake
cover (E)"to the main wing.
f
-3-
EN
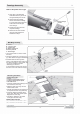
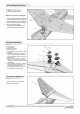
1.
Apply glue to the indicated
areas and allow the glue to set
for approximately one minute.
2.
Attach the Rear Fuselage
Section to the Main Fuselage
by joining and pulling it back off
a few times so the the glue
forms 'strings'.
3.
Position the part to form the
complete fuselage.
4.
Attach the Tail Cone Section
using the same method as
described in Step 2.
Rear Fuselage
Section
Tail cone Section
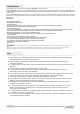
Main Wing Assembly
A- Screws
(PWA1 .7x5mm 2pcs)
B - 17g servo cover
C - 17g servo box
D -Aileron control horn
E -Aileron pushrod
F - Servo trough
Main Wing Installation