
User's Manual

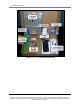


Table Of Contents

2. WP201 Installation and Setup
2.1 Connect to the WP201 Access Point
1. Attach and gently tighten the provided antennas to the appropriate port on the WP201.
2. Attach one of the supplied Green Ground Cables to the Ground screw on the PoE
Injector.
3. Attach the other end of the Green Ground Cable to a weather-proof ground.
4. Using one of the CAT5e Ethernet cables, connect one end of the cable to the LAN 1 Port
(PoE Input) of the WP201 and the other end into the AP/Bridge port on the PoE Injector.
5. Connect the second CAT5e Ethernet cable to the Network port of the PoE Injector and
the other end to the computer Ethernet port.
6. Connect the Power Adapter to the DC IN port of the PoE Injector and plug the other end
into an electrical outlet.
Figure 7: Connecting the WP201 Access Point
Note: The WP201 can be powered through the LAN 1 Port (PoE Input) by any PSE (Power Sourcing
Equipment) which supports IEEE802.11at (PoE+) including the provided PoE Injector. With adequate
input power, the WP201 can power a device connected to the LAN 2 Port (PSE Output).
Page 18 of 38 LUM0073AA Rev Aug-2015
This document is the property of FreeWave Technologies, Inc. and contains proprietary information owned by
FreeWave®. This document cannot be reproduced in whole or in part by any means without written permission from
FreeWave Technologies, Inc.