® Models RCS-M2000T RCS-M2000U PORTABLE AIR CONDITIONER OPERATION MANUAL IMPORTANT NOTICE: To avoid damage and voiding your warranty, place the unit in its upright position for a minimum of two hours before operating. For best results, and more enjoyment from your new FREECOM portable air conditioning unit, please read this instruction manual carefully and save for future reference.
TABLE OF CONTENTS Owner's Record ............................................................................................................2 Features ........................................................................................................................3 Accessories ..................................................................................................................3 Important Safety Information .................................................................................
FEATURES Thank you for purchasing the FREECOM RCS-M2000 Portable Air Conditioner. The RCS-M2000 series Portable Air Conditioner is designed with many state-of-the art features: • Quiet, durable caster wheels allow for easy movement and instant spot cooling in any room. • Convenient, electronic operation panel enables one-touch control of all functions. • Provides clean, fresh, air conditioned, dehumidified air. • Automatic, oscillating louvers provides air distribution over a wide area .
TRES IMPORTANT Pour éviter les risques d'incendie ou de choc électrique, n'exposez pas l'appareil à la pluie ou à l'humidité. En cas de panne, faites appel au service après-vente qualifié pour effectuer des réparations sur cet appareil. Votre climatiseur contient un réfrigérant qui passe d'une phase gazeuse à une phase liquide au moyen d'un compresseur. Il doit être utilisé en position verticale.
IMPORTANT SAFETY INFORMATION PLEASE READ AND FOLLOW ALL SAFETY INFORMATION AND INSTRUCTIONS BEFORE OPERATING YOUR NEW FREECOM AIR CONDITIONER. WARNING: ELECTRICAL SHOCK HAZARD. Failure to follow the safety information below can result in severe personal injury or property damage. • • • • • • • Use this product only with the proper electrical voltage. (See “Specifications.”) DO NOT use the electrical plug to start or stop the unit.
PRODUCT PARTS A B C D E G REAR VIEW H I M FRONT VIEW F E L K A. B. C. D. E. F. G. H. I. J. K. L. M.
THE CONTROL PANEL 1 2 3 1. 2. 3. 4. 5. 6. 7. 7 4 6 5 POWER ON/OFF Easy push-button control switch to turn the unit ON and OFF. MODE There are four different fan speed settings: • FAN—Fan only (no cooling) • HI—High fan speed with cooling setting • ME—Medium fan speed with cooling setting • LO—Low fan speed with cooling setting. THERMO CONTROL The Thermo Control automatically defaults to a temperature of approximately 75ÞF when the unit is started.
SPECIFICATIONS Model Power/Electrical Requirements Cooling Capacity Input EER RCS-M2000T RCS-M2000U RCS-M2000B 110/115 volt, 60Hz 230 volt, 50Hz 220/240 volt, 60Hz 8000 BTU/h (2300W) 7500 BTU/h (2300W) 8000 BTU/h (2300W) 800W 660W 800W 10 N/A N/A BEFORE USING IMPORTANT: Remove unit from packaging and discard clear, plastic wrapping. Place unit in its upright position for a minimum of three hours before operating for the first time. 1. Place unit on a solid, level surface.
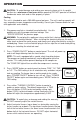
OPERATION CAUTION: To avoid damage and voiding your warranty, place unit in its upright position for a minimum of two hours before operating. DO NOT operate unit without condensate water tank and air filter properly in place. Cooling This unit is intended to cool a 200-400 square foot area. The unit’s cooling capacity will vary according to room temperature and humidity. Consult your Freecom dealer for specific application and suitability. 1. Plug power cord into a standard household outlet.
OPERATION (contd.) 6. Press “AUTO SWING” button on control panel to begin oscillating vertical louvers. The vertical louvers will move slowly from left to right and back again for optimum air distribution. Press button again to maintain a desired “fixed” position to distribute more cooling air to one side of the room. DO NOT adjust vertical louvers manually. 7. If desired, press “TIMER-SET” button on control panel to program the air conditioning unit to turn off in 1, 2, 3, 4, 5, 6, 7, 8, or 9 hours.
ACCESSORY INSTALLATION Window Panel Kit (Optional Accessory) The Window Panel Kit is an accessory which, when used with the Exhaust Duct Kit, will increase cooling efficiency by directing warm air exhaust out a window and preventing outside air from getting into the room. 1. Extend panels to fit in window opening. For vertical windows, be sure cut-out is to the bottom. 2. To secure panels in place, install set screws into two smaller holes on outer panel. 3. Locate two long, rubber weather strips.
MAINTENANCE AND CLEANING Emptying Condensate Water Tank When the condensate water tank is full, the “FULL TANK” indicator light will flash,the unit will sound several initial warning beeps, and the unit will automatically turn off. NOTE: If emptying water tank before “full tank” alert, press “POWER ON/OFF” button to stop unit if it is operating. 1. Unplug power cord from outlet. Allow unit to remain off for 3-5 minutes. 2.
MAINTENANCE AND CLEANING (contd.) Cleaning Air Filter This unit has one air filter. For best results and maximum performance, clean filter every two weeks, or as required by environmental conditions. CAUTION: Neglect or failure to regularly clean the filter will result in poor efficiency, reduced performance, possible damage to the unit, and voiding your warranty. 1. Press “POWER ON/OFF” button to stop unit if it is operating. Unplug power cord from outlet. 2.
MAINTENANCE AND CLEANING (contd.) Cleaning Cabinet Exterior WARNING: ELECTRICAL SHOCK HAZARD: • • • • Turn off unit and unplug from wall outlet before cleaning. Never submerse the unit in any type of liquid or expose to heavy moisture. Never spray, pour, or sponge water directly onto the unit . Never use brushes, brooms, harsh detergents, chemicals, solvents, gasoline, or any other abrasive materials or household items to clean the unit.
STORAGE NOTE: Optional storage cover available for model M2000T/U (Part # RRG9723-55-1). For information about ordering a storage cover, consult your Freecom Dealer. 1. Press “POWER ON/OFF” button to stop unit if it is operating. Unplug power cord from outlet. 2. Remove and empty condensate water tank. See “Emptying Condensate Water Tank” under “MAINTENANCE AND CLEANING.” 3. Remove plug from condensate tube (inside water tank compartment) and drain water. Replace plug tightly onto end of tube. 4.
TROUBLESHOOTING Before contacting a dealer or qualified service technician, please read and check the following: PROBLEM SOLUTION Unit does not turn on. 1. 2. 3. 4. 5. 6. 7. 8. 9. Unit running low air flow or cooling. 1. 2. 3. 4. Unit noisy when operating. 1. 2. 3. 4. Water leaking from unit. 1. 2. Make sure city power supply is normal. Check plug is correctly installed into outlet. Check fuses and household breaker switches. Remove electrical plug from outlet.