
Computer Drive User Manual

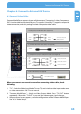


Table Of Contents
- Freecom MediaPlayer - User manual
- Dear customer
- Table of Contents
- General Information
- Warnings and Safety Instructions
- Product Overview
- Chapter 1: Use as External USB HDD
- Chapter 2: Access PC via Network
- Chapter 3: Shared File Playback (Stream)
- Chapter 4: Use as Network Storage (NDAS)
- Chapter 5: Freecom MediaPlayer for Mac
- Chapter 6: Connect to External AV Device
- 6.1 Connect Video Cable
- 6.2 Connect Audio Cable
- 6.3 Basic Setup
- 6.3.1 Video Setup
- 6.3.2 Audio Setup
- 6.3.3 Network Setup
- 6.3.4 Wireless Setup
- 6.3.5 Wireless Security Setup
- 6.3.6 Folder Lock
- 6.3.7 LED Setup
- 6.3.8 Photo View Setup
- 6.3.9 Language Setup
- 6.3.10 Screen Ratio Setup
- 6.3.11 Auto Play Setup
- 6.3.12 NDAS Setup
- 6.3.13 Internet (How to setup the Internet)
- 6.3.14 i-RADIO
- 6.3.15 Skin
- 6.3.16 Others
- 6.3.17 Protocol
- 6.3.18 FTP
- 6.4 How to Play (Remote Control)
- Chapter 7: Technical Specifications
- Warranty

65
Connect to External AV Device
EN
6
6.3 Basic Setup
6.3.1 Video Setup
This is a guide for setting video output of Freecom MediaPlayer. You have to setup Free-
com MediaPlayer's video output mode same as TV set's video input mode.
When you can not see normal screen after connecting video cable, check
the followings:
1.
"TV "– Switch to Video Input Mode: Turn on TV, and switch to video
input mode same as video connection. See TV user manual.
2. "
Freecom MediaPlayer" – Switch to Video Output Mode: Press "TV
OUT" button repeatedly. Whenever "TV OUT" is pressed, the video
output signal changes.
3. W
hen a normal screen appears, save the video configurations of the
Freecom MediaPlayer.