
Computer Drive User Manual

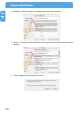

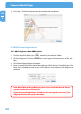


Table Of Contents
- Freecom MediaPlayer - User manual
- Dear customer
- Table of Contents
- General Information
- Warnings and Safety Instructions
- Product Overview
- Chapter 1: Use as External USB HDD
- Chapter 2: Access PC via Network
- Chapter 3: Shared File Playback (Stream)
- Chapter 4: Use as Network Storage (NDAS)
- Chapter 5: Freecom MediaPlayer for Mac
- Chapter 6: Connect to External AV Device
- 6.1 Connect Video Cable
- 6.2 Connect Audio Cable
- 6.3 Basic Setup
- 6.3.1 Video Setup
- 6.3.2 Audio Setup
- 6.3.3 Network Setup
- 6.3.4 Wireless Setup
- 6.3.5 Wireless Security Setup
- 6.3.6 Folder Lock
- 6.3.7 LED Setup
- 6.3.8 Photo View Setup
- 6.3.9 Language Setup
- 6.3.10 Screen Ratio Setup
- 6.3.11 Auto Play Setup
- 6.3.12 NDAS Setup
- 6.3.13 Internet (How to setup the Internet)
- 6.3.14 i-RADIO
- 6.3.15 Skin
- 6.3.16 Others
- 6.3.17 Protocol
- 6.3.18 FTP
- 6.4 How to Play (Remote Control)
- Chapter 7: Technical Specifications
- Warranty

60
Freecom MediaPlayer
EN
5
5.8 Partitioning your Freecom MediaPlayer under Mac OS X
1. Open the "Disk Utility". This can be found in "Applications" —> "Utilities".
2. Click on the tab "Partition".
Here you can setup the partition settings and partition the drive according to your set-
tings (e.g. Mac OS Extended). Detailed information how to use the Disk Utility can be
found in the help:
5.9 FAQ Mac
1. How do I Disconnect Freecom MediaPlayer?
To disconnect Freecom MediaPlayer, we always recommend using the Eject option. If
you CRTL+click on the Netdisk on your Desktop, then you will be given an option to Eject
the Freecom MediaPlayer. You may also drag the Freecom MediaPlayer into your Trash.
After that, you can go into NDAdmin and Disable your Freecom MediaPlayer. If you are
using USB, then Ejecting the Freecom MediaPlayer is all that is needed.