
Computer Drive User Manual

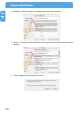

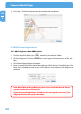

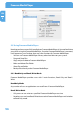


Table Of Contents
- Freecom MediaPlayer - User manual
- Dear customer
- Table of Contents
- General Information
- Warnings and Safety Instructions
- Product Overview
- Chapter 1: Use as External USB HDD
- Chapter 2: Access PC via Network
- Chapter 3: Shared File Playback (Stream)
- Chapter 4: Use as Network Storage (NDAS)
- Chapter 5: Freecom MediaPlayer for Mac
- Chapter 6: Connect to External AV Device
- 6.1 Connect Video Cable
- 6.2 Connect Audio Cable
- 6.3 Basic Setup
- 6.3.1 Video Setup
- 6.3.2 Audio Setup
- 6.3.3 Network Setup
- 6.3.4 Wireless Setup
- 6.3.5 Wireless Security Setup
- 6.3.6 Folder Lock
- 6.3.7 LED Setup
- 6.3.8 Photo View Setup
- 6.3.9 Language Setup
- 6.3.10 Screen Ratio Setup
- 6.3.11 Auto Play Setup
- 6.3.12 NDAS Setup
- 6.3.13 Internet (How to setup the Internet)
- 6.3.14 i-RADIO
- 6.3.15 Skin
- 6.3.16 Others
- 6.3.17 Protocol
- 6.3.18 FTP
- 6.4 How to Play (Remote Control)
- Chapter 7: Technical Specifications
- Warranty

57
Freecom MediaPlayer for Mac
EN
5
5.5.2 Changing Read Only or Read / Write Mode
Open your NDAS Utility by clicking on your Macintosh HD icon on your Desktop, double
click on your Applications Folder, then your Utilities folder.
Mo
unt with Read Only Mode
• Select the NDAS Device you want to mount.
• Click on Unit Device.
• Under Configuration select Mount Read Only.
• The status will now show Mounted with Read Only.
Mount with Read / Write Mode
• S
elect the NDAS Device you want to mount.
• Click on Unit Device.
• Under Configuration select Mount Read / Write.
• The Status will now show Mounted with Read / Write.
Note: If no other user or application is using the Freecom MediaPlayer, the
status will change with the specified mounting command. If a user or ap-
plication is using the Freecom MediaPlayer, the status will not change.
Until both the Configuration and Status display the mount information
is the Freecom MediaPlayer in that state.