
Computer Drive User Manual
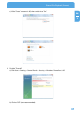

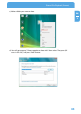


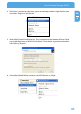


Table Of Contents
- Freecom MediaPlayer - User manual
- Dear customer
- Table of Contents
- General Information
- Warnings and Safety Instructions
- Product Overview
- Chapter 1: Use as External USB HDD
- Chapter 2: Access PC via Network
- Chapter 3: Shared File Playback (Stream)
- Chapter 4: Use as Network Storage (NDAS)
- Chapter 5: Freecom MediaPlayer for Mac
- Chapter 6: Connect to External AV Device
- 6.1 Connect Video Cable
- 6.2 Connect Audio Cable
- 6.3 Basic Setup
- 6.3.1 Video Setup
- 6.3.2 Audio Setup
- 6.3.3 Network Setup
- 6.3.4 Wireless Setup
- 6.3.5 Wireless Security Setup
- 6.3.6 Folder Lock
- 6.3.7 LED Setup
- 6.3.8 Photo View Setup
- 6.3.9 Language Setup
- 6.3.10 Screen Ratio Setup
- 6.3.11 Auto Play Setup
- 6.3.12 NDAS Setup
- 6.3.13 Internet (How to setup the Internet)
- 6.3.14 i-RADIO
- 6.3.15 Skin
- 6.3.16 Others
- 6.3.17 Protocol
- 6.3.18 FTP
- 6.4 How to Play (Remote Control)
- Chapter 7: Technical Specifications
- Warranty

50
Freecom MediaPlayer
EN
5
Chapter 5: Freecom MediaPlayer for Mac
5.1 USB 2.0 Mode
In USB 2.0 Mode Freecom MediaPlayer is directly attached to a computer's USB Port.
Freecom MediaPlayer via USB
5.2 NDAS Mode
In NDAS Mode Freecom MediaPlayer is directly attached to a 100 Mbit/s Full Duplex Fast
Ethernet Switch or Wireless Access Point. Each user on the network can use Freecom
MediaPlayer as if it was a local disk drive.
Freecom MediaPlayer via Router/Switch Freecom MediaPlayer via WLAN
1. Connect your Local Area Network (LAN) cable to Freecom MediaPlayer Ethernet Port.
This connection provides network access from your LAN or router to the Freecom
MediaPlayer.
2.
Connect the included Ethernet cable to your PC.
Wireless users: Connect Freecom MediaPlayerto your wireless router or
access point with included Ethernet cable.
3. M
ake sure the power connector is firmly attached to the Freecom MediaPlayer and
c
onnect the power adapter to a power source.
4. Press Power button on the frontside.