
Computer Drive User Manual


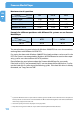


Table Of Contents
- Freecom MediaPlayer - User manual
- Dear customer
- Table of Contents
- General Information
- Warnings and Safety Instructions
- Product Overview
- Chapter 1: Use as External USB HDD
- Chapter 2: Access PC via Network
- Chapter 3: Shared File Playback (Stream)
- Chapter 4: Use as Network Storage (NDAS)
- Chapter 5: Freecom MediaPlayer for Mac
- Chapter 6: Connect to External AV Device
- 6.1 Connect Video Cable
- 6.2 Connect Audio Cable
- 6.3 Basic Setup
- 6.3.1 Video Setup
- 6.3.2 Audio Setup
- 6.3.3 Network Setup
- 6.3.4 Wireless Setup
- 6.3.5 Wireless Security Setup
- 6.3.6 Folder Lock
- 6.3.7 LED Setup
- 6.3.8 Photo View Setup
- 6.3.9 Language Setup
- 6.3.10 Screen Ratio Setup
- 6.3.11 Auto Play Setup
- 6.3.12 NDAS Setup
- 6.3.13 Internet (How to setup the Internet)
- 6.3.14 i-RADIO
- 6.3.15 Skin
- 6.3.16 Others
- 6.3.17 Protocol
- 6.3.18 FTP
- 6.4 How to Play (Remote Control)
- Chapter 7: Technical Specifications
- Warranty

13
Use as External USB HDD
EN
1
1.2 Connect the Freecom MediaPlayer to the PC
1. Connect the USB cable to the Freecom MediaPlayer and connect the power adapter
to the DC jack on the Freecom MediaPlayer.
2. Connect the adapter into an AC outlet.
3. Connect the Freecom MediaPlayer to the PC's USB port.
4. Switch the power on by pressing the power on-off button on the Freecom Media-
Player.
5.
Windows 2000, Windows XP and Windows Vista will recognize the Freecom Me-
diaPlayer as a USB drive; you can use the Freecom MediaPlayer without installing a
driver. If the Freecom MediaPlayer is not recognized or detected, please check that
the USB connector is properly connected to the device and the PC.
1.3 Format Built-in HDD via USB
File System features
Please refer to the tables below for an overview:
File systems supported by different operating systems
File system
Operating system
FAT FAT32 NTFS
Windows 98SE yes yes not supported
Windows ME yes yes not supported
Windows 2000 yes yes yes
Windows XP / Vista yes yes yes
4. Put the 4 screws back.