
Computer Drive User Manual


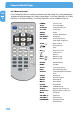


Table Of Contents
- Freecom MediaPlayer - User manual
- Dear customer
- Table of Contents
- General Information
- Warnings and Safety Instructions
- Product Overview
- Chapter 1: Use as External USB HDD
- Chapter 2: Access PC via Network
- Chapter 3: Shared File Playback (Stream)
- Chapter 4: Use as Network Storage (NDAS)
- Chapter 5: Freecom MediaPlayer for Mac
- Chapter 6: Connect to External AV Device
- 6.1 Connect Video Cable
- 6.2 Connect Audio Cable
- 6.3 Basic Setup
- 6.3.1 Video Setup
- 6.3.2 Audio Setup
- 6.3.3 Network Setup
- 6.3.4 Wireless Setup
- 6.3.5 Wireless Security Setup
- 6.3.6 Folder Lock
- 6.3.7 LED Setup
- 6.3.8 Photo View Setup
- 6.3.9 Language Setup
- 6.3.10 Screen Ratio Setup
- 6.3.11 Auto Play Setup
- 6.3.12 NDAS Setup
- 6.3.13 Internet (How to setup the Internet)
- 6.3.14 i-RADIO
- 6.3.15 Skin
- 6.3.16 Others
- 6.3.17 Protocol
- 6.3.18 FTP
- 6.4 How to Play (Remote Control)
- Chapter 7: Technical Specifications
- Warranty

104
Freecom MediaPlayer
EN
6
6.4.9 Others
Change Background Image
Change the Background Image on the Freecom MediaPlayer by selecting a picture file
and saving it as 'mybg.jpg' in the root directory of the built-in HDD.
(An image of 720x480 pixels is recommended).
Firmware Upgrade
Download an upgrade file from a local distributor in your country or visit:
www.freecom.com/support.
Connect the Freecom MediaPlayer to a TV set and turn it on, select the upgrade file and
press "OK". The upgrade will progress automatically.
To check the firmware, press "SETUP" in the setup screen.
Select the file and press the "INFO" button to display the current firmware version.