USER MANUAL NETWORK DRIVE XS EXTERNAL NETWORK HARD DRIVE / 3.5" / GIGABIT LAN / USB 2.0 Rev.
Freecom Network Drive XS Dear user, EN Thank you for selecting the Freecom Network Drive XS. The Freecom Network Drive XS offers easy-to use network storage possibilities. To ensure you get the best performance and ease of operation, please read this manual carefully before using the Freecom Network Drive XS. Freecom Technologies GmbH • Germany www.freecom.
Table of Contents User's Guide EN General Information System requirements................................................................................................... Page 4 Precautionary measures............................................................................................. Page 5 Freecom Network Drive XS Setup Overview...................................................... Page 6 Chapter 1: Hardware Installation...................................................................
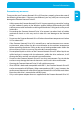
Freecom Network Drive XS General Information EN Your system needs to meet the following hardware and software requirements for the device to function properly. System requirements To use the Freecom Network Drive XS, you will require the following components: PC: • Intel Pentium III / AMD Duron 900 MHz or higher • 256 MB RAM (Vista / 7: 512 MB RAM) or higher • CD-ROM drive • Free USB 2.0 or USB 1.1.
General Information Precautionary measures EN To ensure that your Freecom Network Drive XS functions properly, please take note of the following precautions. If these are not followed, you may void your warranty and damage the Freecom Network Drive XS. • Safely remove the Freecom Network Drive XS via your operating system (the "unplug or eject hardware" option in the Windows taskbar) before disconnecting the USB cable or power cable and before switching off the device.
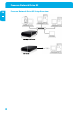
Freecom Network Drive XS Freecom Network Drive XS Setup Overview EN LAN (Ethernet) mode USB-mode 6
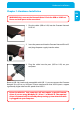
Hardware Installation Chapter 1: Hardware Installation EN WARNING! Only connect the Network Drive XS via the USB or LAN Port. Never use both ports at the same time! 1 1. Plug the cable (USB or LAN) into the Freecom Network Drive XS. 2. Insert the power cord into the Freecom Network Drive XS and plug the power supply into the socket. 3. Plug the cable into the port (USB or LAN) on your computer. Because USB 2.0 is backwards compatible with USB 1.
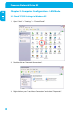
Freecom Network Drive XS Chapter 2: Computer Configuration - LAN Mode EN 2.1 Check TCP/IP Settings in Windows XP 2 1. Open "Start" -> "Settings" -> "Control Panel". 2. Double-click on "Network Connections". 3. Right-click on your "Local Area Connection" and select "Properties".
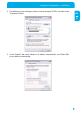
Computer Configuration - LAN Mode 4. The following screen will appear. Select "Internet Protocol (TCP/IP)" and click on the "Properties" button. EN 2 5. In the "General" tab, select "Obtain an IP address automatically" and "Obtain DNS server address automatically".
Freecom Network Drive XS 2.2 Check TCP/IP Settings in Windows Vista / 7 EN 1. Open "Control Panel" -> "Network and Sharing Center". 2 2. Click on "Manage network connections".
Computer Configuration - LAN Mode 3. Right-click on "Local Area Connection" and select "Properties". EN 2 4. In the "Networking" tab, select "Internet Protocol Version 4 (TCP/IPv4)" and click on "Properties".
Freecom Network Drive XS 5. In the "General" tab, select "Obtain an IP address automatically" and "Obtain DNS server address automatically". EN 2 2.3 Check TCP/IP Settings in Mac OS X 1. Open "System Preferences" -> "Network".
Computer Configuration - LAN Mode 2. In the "TCP/IP" tab, select "Using DHCP" in the "Configure IPv4" settings.
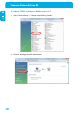
Freecom Network Drive XS Chapter 3: Installation of the application software EN 3.1 Installation of the Freecom Network Storage Assistant Software (PC) The Freecom Network Storage Assistant quickly detects and performs the basic setup of your Network Drive XS. When you start it, it displays all Freecom Network devices available in your network and helps you creating network folders. 3 1. Please insert the Manual & Application CD into your drive.
Installation of the application software 3.2 Installation of the Freecom Network Storage Assistant Software (Mac) EN The Freecom Network Storage Assistant quickly detects and performs the basic setup of your Network Drive XS. When you start it, it displays all Freecom Network devices available in your network and helps you creating network folders. 3 1. Please insert the Manual & Application CD into your drive. It contains user manuals and software, including the Freecom Network Storage Assistant. 2.
Freecom Network Drive XS Chapter 4: Accessing the Network Drive XS EN 4.1 Accessing data via SMB Server Message Block (SMB) operates as a network protocol mainly used to provide shared access to files between nodes on a network. 4 Windows Open Windows Explorer and enter either \\NDXS* or \\IP_ADDRESS in the address bar (IP_ADDRESS is the IP address of your Network Drive XS). If you have changed the host name or the IP address, please use the new settings.
Accessing the Network Drive XS Click 'Connect'. Enter the workgroup, your username and password for accessing the Network Drive XS. If you are logging on as the administrator, you will have access to all folders on the Network Drive XS. EN 4 Note: You set the workgroup name of the Network Drive XS under Configuration - Update Device/ Workgroup names in the Network Drive XS Configuration menu. Mac OS X 10.4 Mac OS X 10.5 You now need to select a shared folder on the next screen. Press OK to continue.
Freecom Network Drive XS 4.2 Accessing data via FTP EN Note: Not all browsers can upload data via FTP. Those that can include Internet Explorer and Konqueror. We recommend using FTP client software such as WS_FTP, SmartFTP or CuteFTP. 4 The File Transfer Protocol (FTP) is a standard network protocol used to exchange files over an Internet Protocol (TCP/IP) computer network. The FTP protocol is built on a client-server architecture. 4.2.1 Local access Enable the FTP Server option.
Accessing the Network Drive XS 2. Dynamic DNS EN Dynamic Domain Name System gives the ability to provide an official DNS name such as www.yourname.com to the dynamic IP address you have gotten from your ISP. 4 To do so, you first need to register with a DynDNS service. It updates the modified IP addresses and forwards this to the domain name. This enables you to be reached at one single domain name at any time even if your IP address changes.
Freecom Network Drive XS Chapter 5: Configuration of the Freecom Network Drive XS EN For easier access we recommend using the PC configured as DHCP Client as described in the previous chapter. 5 As default, the DHCP Server of the Freecom Network Drive XS is switched on. This can be changed in the "Status" section of the web configuration. 5.1 The Freecom Network Storage Assistant (PC/Mac) You can use the "Freecom Network Storage Assistant" to configure the Freecom Network Drive XS.
Configuration of the Network Drive XS Accessing your Network Drive XS web interface EN When you click this menu item, the web interface for your Freecom Network Drive XS opens in your default browser. 5 Adding and removing shared folders You can assign a drive letter to shared folders on your Freecom Network Drive XS. This allows you to access to the files more quickly.
Freecom Network Drive XS Repeat search for available Freecom Network Drive XS EN Click here to repeat the search for your Freecom Network Drive XS if it was not detected during the first search. Please make sure that your network is configured as described in this manual and that all cables are properly attached. 5 5.2 Using the Freecom Network Drive XS web interface 1. Open your web browser, type "type "http://NDXS" into the URL address box and press "Enter". 2. The login dialog box will appear.
Configuration of the Network Drive XS 3. The start screen of the Freecom Network Drive XS web interface will open. Now you can continue configuring your Freecom Network Drive XS.
Freecom Network Drive XS 5.3 Basic Settings (Status) of the Freecom Network Drive XS EN In the web interface, click on "Status" to change the basic settings of the Freecom Network Drive XS: 5 5.3.1 Status – System Information Setting up host and group name Click on the "Change" button next to the "Host Name" field. Enter the desired host and group names and click on "OK" to apply your settings. Setting up the administrator password Click on the "Change" button next to the "Administrator" field.
Configuration of the Network Drive XS EN 5 Enter your new administrator password and repeat entry in the second field for verification. Click on "OK" to apply your new password. Configuring the time settings You can setup date and time of your Freecom Network Drive XS either manually or automatically. Manual Configuration Enter date and time and select the "Disable" button to disable the usage of a time server. Choose whether to use "Daylight Saving Time" or not. Click on "OK" to save your settings.
Freecom Network Drive XS Firmware Version EN In the "Firmware Version" section you can find information which firmware version is used in your device. Please have this information available for the Freecom Support if you have problems with your Freecom Network Drive XS. 5 5.3.2 Status – Network Information DHCP Server Configuration In this section you can select whether to use the Freecom Network Drive XS as DHCP Server or not.
Configuration of the Network Drive XS 5.4 IP Config EN In the "IP Config" section of the web interface it can be configured whether the Freecom Network Drive XS has a static IP address or gets an automatic IP address assigned by another DHCP Server in the network. 5 ATTENTION: Do not use "Automatic IP" if the DHCP Server is already switched on on the "Status" page! "Automatic IP" is not available when the DHCP Server of the Freecom Network Drive XS is already running. 5.
Freecom Network Drive XS EN 5 5.
Configuration of the Network Drive XS 5.6.1 User Account List EN In the "Account List", you can add or delete users and modify their access rights. New 5 Click on "New" to add a new user. Enter a user name and a password and click on "Apply". Modify Click on "Modify" to change the user access rights. You can - set or change the user password - give the user read-only or read/write access - select folder the user is allowed to access After changing the settings, click on "Modify" to apply settings.
Freecom Network Drive XS Rename EN Opens the menu to rename an existing shared folder. 5 Delete Opens the menu to delete an existing shared folder.
Configuration of the Network Drive XS 5.6.3 Sharing folders EN Adding a shared folder To add a folder to the Sharing List, select a folder in the "Folder List" and click on the "->" button. The folder will now appear in the "Sharing List". 5 5.6.4 Mounting shared folders PC Windows users can use the Freecom Network Storage Assistant to map shared folders with a drive letter.
Freecom Network Drive XS Mac OS X EN Select 'Go To' -> 'Connect with Server...'from the menu bar. The Freecom Network Drive XS address is: 5 smb://169.254.0.1 or else smb://NETWORKDRIVE_NAME (factory default is smb://NDXS). Click 'Connect'. You now need to select a shared folder on the next screen. Press OK to continue. Enter the workgroup, your username and password for accessing the Freecom Network Drive XS. User name to login always has to be "admin"! 5.
Configuration of the Network Drive XS Modify EN Click on "Modify" to change the user access rights. You can - set or change the user password - give the user read-only or read/write access - select folder the user is allowed to access 5 After changing the settings, click on "Modify" to apply settings. En/Disable Click on "En/Disable" to enable or disable the user access for the selected user. Delete Click on "Delete" to delete a user from the list. Confirm with "OK" to delete the user.
Freecom Network Drive XS Modify EN Click on "Modify" to change the user access rights. You can 5 - set or change the user password - give the user read-only or read/write access - select folder the user is allowed to access After changing the settings, click on "Modify" to apply settings. En/Disable Click on "En/Disable" to enable or disable the user access for the selected user. Delete Click on "Delete" to delete a user from the list. Confirm with "OK" to delete the user.
Configuration of the Network Drive XS 5.7.1 Internal FTP access EN Use any FTP client software (e.g. WS_FTP, SmartFTP or CuteFTP) or open your browser and enter 5 ftp://USERNAME:USERPASSWORD@ or ftp://USERNAME:USERPASSWORD@ = user name = password of user = IP address of your Freecom Network Drive XS = Host name of the Freecom Network Drive XS as specified in the settings 5.7.
Freecom Network Drive XS 5.8 Media Server EN The Freecom Network Drive XS can be used to store all your multimedia files on, and play them back on any computer or Audio/Video (UPnP) streaming device in your network. 5 5.9 Configure Torrent Download Client The Torrent Download Client supports the download of files over the bittorrent network. Enter the URL of a torrent file and click on "Upload".
Configuration of the Network Drive XS You can specify the maximum upload and download rate (KB/s) for each file individually by entering values in the corresponding fields before pressing "Upload". EN To get maximum performance for your torrent downloads, you can configure a port to be forwarded from your router to the Network Drive XS. 5 You can use the standard port 6881 for the port forwarding, but you may also select another port.
Freecom Network Drive XS Chapter 6: LAN Connection Types of the Freecom Network Drive XS EN 6 6.1 Direct connection to a PC Once the PC/Mac is setup as DHCP client as described in the chapter "Check TCP/IP Settings on PC/Mac" the user has to configure SMB Server and/or the FTP Server to work with the device via network connection.
LAN Connection Types of the Freecom Network Drive XS EN 6 5. Select "Automatic IP" and click on "Apply" to save your changes. 6. Disconnect the Freecom Network Drive XS from your PC and connect it to your router. 7. Your Freecom Network Drive XS will now get an IP address assigned by the DHCP Server of your router. Every PC/Mac connected to your network can now access your Freecom Network Drive XS. You can now use the Freecom Network Storage Assistant for an easy access to your Freecom Network Drive XS.
WARRANTY (valid in Europe/Turkey only) We thank you for purchasing this Freecom product and hope you will enjoy using it. In order to avoid unnecessary inconvenience on your part, we suggest reading the quick install guide, instruction manual and any additional electronic and or printed manuals. When problems occur we have a database with Frequently Asked Questions (FAQ) on our Freecom website (www.freecom.com), please check this site before you contact the helpdesk.