FREECOM MediaPlayer-3 MANUAL Rev.
Freecom MediaPlayer-3 Dear customer, GB Thank you for your purchasing the Freecom MediaPlayer-3. The digital media player that stores MPEG4/DivX video’s, MP3 music or JPEG pictures on its hard drive and allows you to enjoy these directly on a TV and/or HiFi, without the use of a computer. The Freecom MediaPlayer-3 will give you years of viewing and listening enjoyment. Of course you can also always use it as a regular portable external hard drive.
Table of Contents Users manual GB General Information .......................................................................... page 4 Warnings and Safety Instructions ...................................................... page 6 Chapter 1: Getting Started ................................................................................... page 8 Chapter 2: Connecting the MediaPlayer-3 to the PC .......................................... page 10 Chapter 3: Connection to Television ................
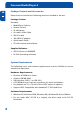
Freecom MediaPlayer-3 Package Content and Accessories GB Please check to see that the following items are included in the box. Package Content Standard: • MediaPlayer-3 device • Remote Control • 2x AA Battery • AV cable, Audio Cable • USB 2.0 cable • 100-240V AC adapter • Quick Install Guide • CD with manual and software Supplied Software • USB 2.0 Driver for WIN98SE • Dr.
General Information Main Features GB Movie Store movies, TV shows, music videos and more from your PC onto the player and view them directly on your TV or projector anytime, anywhere. The player is able to play MPEG-4 (DivX) video files in DVD quality. Multi-codec Music Player The player features a newly designed music player that plays MP3, WMA, OGG and ASF music files anytime, anywhere. Thanks to the high-quality 1.2” backlit LCD, you can enjoy your favorite song directly from the device...
Freecom MediaPlayer-3 Warnings and Safety Instructions GB Please read and follow the below mentioned instructions. They should be observed in order to prevent injury to the user, damage to the device and damage to property, as well as to ensure safe use of the product. Not following these instructions may cause the unit to malfunction. Warnings and Safety To ensure that your Freecom MediaPlayer-3 functions properly, please take note of the following precautions.
Warnings and Safety Instructions Furthermore, warranty does not apply to: • Damages or problems resulting from misuse, abuse, accident, alteration or incorrect electrical current or voltage. • Any product tampered-with or damaged warranty seal or serial number label. • Any product without a warranty or serial number label. • Batteries and any consumable items delivered with or in the equipment.
Freecom MediaPlayer-3 Chapter 1: Getting Started GB Please familiarize yourself with the device before using it. Make sure you connect the device to your PC or TV or HiFi according to the below mentioned instructions. 1 1. 1 FRONT VIEW All basic operation functions can be done with the buttons on the device, without use of the remote control.
Getting Started 1.
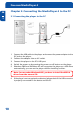
Freecom MediaPlayer-3 Chapter 2: Connecting the MediaPlayer-3 to the PC GB 2.1 Connecting the player to the PC 2 USB Cable AC Adaptor PC 1. Connect the USB cable to the player and connect the power adapter to the DC jack on the player. 2. Connect the adapter into an AC outlet. 3. Connect the player to the PC’s USB port. 4. Switch the power on by pressing the power on-off button on the player 5.
Connecting the MediaPlayer-3 to the PC 2.2 Hard drive format GB Your Freecom MediaPlayer-3 is already formatted (FAT-32) when it comes from the factory. 2 If, when you turn on the player, the initial screen appears but after that the Video Audio Photo select screen does not appear, this means that the harddrive inside is not formatted. Please refer to the below instructions how to format a hard drive. Note: Partitioning your Freecom MediaPlayer-3 (PC only) on Chapter 7 page 19.
Freecom MediaPlayer-3 2.4 To disconnect the player from the PC GB To safely remove the MediaPlayer-3 from your PC, click the ‘Safely Remove Hardware’ icon in the System Tray, select the MediaPlayer-3 device and click on . Wait until Windows has finished removing the hardware, and disconnect the USB cable from the USB port. 3 Caution! Do not disconnect the player while the drive is in use. Complete any file copying activity before attempting to disconnect from your PC.
Connection to Television 3.2 Connecting the audio cables to TV/ Amplifier GB Connect only one audio cable type directly to your AV system. Connection depends on the connectors available on your AV set. 3 AUDIO OUT (L/ R) jacks: To hear the sound of this Player through your TV or HiFi set, connect the audio cables (white/red) to the AUDIO IN jacks on the TV or AUX IN on your amplifier (cable supplied). OPTICAL: The digital 5.1 channel connection provides the best sound quality.
Freecom MediaPlayer-3 Chapter 4: Playing Multimedia files on TV/HiFi GB 4.1 Powering on player 4 1. Connect AC power adapter to the player. 2. Plug the AC power cord into the power outlet. 3. Turn on your TV, turn on the MediaPlayer-3 and select your video input on the TV(AV Mode). 4. When you have turned on the MediaPlayer-3. the Video/Audio/Photo menu should be shown on your TV.
Playing Multimedia files on TV/HiFi 4.2 Player Setup GB Press the [BOOKMARK] button during file playback, the playing time will be stored into the memory. 4 The player will automatically start playing from the position you stored when the [PROGRAM] button is pressed again on the main OSD menu. 1. Press the SETUP button on your remote control, a menu will appear with the available options. 2. Adjust the player to your specific requirements and hardware. 3.
Freecom MediaPlayer-3 Initial Setting GB 4 DVD, VCD PBC On / Off DVD Parental Level Off 1~8 TV Type 4:3 Letter Box / 4:3 Pan Scan / 16:9 Set to normal TV or Wide screen types. MP4 4:3 Full / MP4 16:9 Full Auto Full Screen Display on MPEG4 files. Change Password OSD Default Setup Save 16 Used for DVD or VCD2.0 discs playing. The menu image displays on the screen. Used for parental control ratings. Use for parental control of DVD. And the default password is 0000.
Remote Control Chapter 5: Remote Control To switch power on/off TV out mode (NTSC / PAL) Audio mode select (Analog / Digital) GB Access video file select menu directly Access audio file select menu directly 5 Access photo file select menu directly Access setup menu directly Navigate up/down/left and right To go to specific position To select play file To play previous file / track To play next file / track To start or pause playback To show content information being played Play a single file repeated
Freecom MediaPlayer-3 5.3 Functionality of the buttons on remote GB button 5 18 functionality POWER To power on or power off N/P It’s used to change the video output mode. (NTSC<-> PAL) Video output which is changed by remote is not saved, so you need to change the vidoe output in Setup mode to save it.
Remote Control I< PREVIOUS >I NEXT II> To playback and/or pause << fast rewinder - 8X (8 times)=>16X=>32X=>8X (looping) - 1min(1 minute)=>5min=>10min=>15min=>20min=>cancel=>1min(looping) >> fast forwarder - 8X (8 times)=>16X=>32X=>8X (looping) - 1min(1 minute)=>5min=>10min=>15min=>20min=>cancel=>1min(looping) STOP 1) To stop files when playback 2) In stop mode, to move upper level folder. BOOKMARK To save the position of currently playback movie or audio file.
Freecom MediaPlayer-3 Chapter 6: Basic Operation GB 6.1 Playback of Video/ Audio/ Photo files when connected to TV or HiFi 6 6.1.1 MUSIC Background Skin While listening to music, you can use any digital photo image taken by yourself as a Music background. Just copy any jpg photo file into Root(../) directory like below; • Multimedia Drive / multimediamain.jpg (Main OSD) • Multimedia Drive / multimediafile.jpg (File Selection) • Multimedia Drive / multimediasetup.
Partitioning your Freecom MediaPlayer-3 (PC only) Chapter 7: Partitioning your Freecom MediaPlayer-3 (PC only) GB 7 7.1 General information Your MediaPlayer-3 was partitioned and formatted to provide you with the maximum available capacity and compatibility. FAT32 was chosen as file system to assure that you will be able to read your files on any PC. It is recommended not to change the current configuration of your MediaPlayer-3. For some users another file system might fit better for their needs.
Freecom MediaPlayer-3 Example for different partitions with different file systems on one MediaPlayer-3 GB Total size of MediaPlayer-3 7 120 GB File system NTFS FAT32 90GB 30 GB The example above is a good solution for Windows 2000/XP users who sometimes exchange data with Windows 98SE/ME PCs. For storing the data under Windows 2000/XP both partitions can be used.
Partitioning your MediaPlayer-3 7.3.1 Deleting a partition on the MediaPlayer-3 under Windows 98SE / ME GB The following steps will explain how to delete a partition on your MediaPlayer3. 7 1. Click on the "Start" button. 2. Select "Run". 3. Enter "fdisk" and confirm with "OK". 4. fdisk will be started. Answer the question "Do you wish to enable large disk support?" by pressing the 'Return' key. FAT32 is now activated. 5. Choose Option 5 "(Change current fixed disk drive)" by pressing '5' and 'Return'.
Freecom MediaPlayer-3 7.3.2 Creating a partition on the MediaPlayer-3 under Windows 98 SE / ME GB The following steps will guide you the process of creating partitions on your MediaPlayer-3 under Windows 98SE/ME. After this procedure your Freecom MediaPlayer-3 will be ready for use and it will be allocated a drive letter. 6 1. Click on the "Start" button. 2. Select "Run". 3. Enter "fdisk" and confirm with "OK". 4.
Partitioning your MediaPlayer-3 GB 7 Note: Partition size of large hard disks will not be displayed correctly! However partitioning results will be OK. 7. Select Option 1 "(Create DOS partition or Logical DOS drive)" by pressing '1' and confirm with 'Return'. 8. Select Option 1 "(Create primary DOS partition)" by pressing '1' and confirm with 'Return'. Wait until drive integrity is completely checked. 9.
Freecom MediaPlayer-3 12. Stop your hard disk by using the hot unplug icon in the lower right corner of your screen and remove the USB cable from your hard disk. Afterwards connect your hard disk again with your computer. The hard disk will now be recognized by Windows. GB 6 As Windows tries to access your hard disk an error message will appear. This happens, because your hard disk is not yet formatted. 7.3.3 Creating two or more partitions on the MediaPlayer-3 under Windows 98SE / ME 1.
Partitioning your MediaPlayer-3 7.3.4 Formatting partitions on the MediaPlayer-3 under Windows 98SE / ME GB 1. Double-click on the "My Computer" icon on your desktop. 7 2. Click with the right mouse button on the drive symbol of your MediaPlayer3. Now a menu will appear where you can choose the option "Format". 3. Please perform a complete formatting of your drive. You can also assign a name to your drive here. 4. After you have completed your selection, click on "Start".
Freecom MediaPlayer-3 7.4 Partitioning your MediaPlayer-3 under Windows XP / 2000 GB 7.4.1 Deleting a partition on the MediaPlayer-3 under Windows XP / 2000 7 1. Click with the right mouse button on the "My Computer" icon on your desktop. 2. Select the option "Manage". 3. Select the option "Storage" -> "Disk Management". 4. Choose your external hard drive and right-click on the partition. 5. Select "Delete Partition" and confirm by clicking on "Yes". The partition will be deleted now. 7.4.
Partitioning your MediaPlayer-3 5. Click with the right mouse button on the "unallocated" area and select the option "New Partition" (Windows 2000: "Create Partition Wizard"). The "New Partition Wizard" opens. Click on "Next". GB 7 6. Select "Primary partition" and click on "Next". 7. Now you can adjust the size of your partition. Click on "Next" if only one partition is to be created.
Freecom MediaPlayer-3 GB 7 8. Assign a drive letter to your hard disk. Normally you can use the default options. Click on "Next". 9. Select the formatting option. Choose either "FAT32" or "NTFS", the "Allocation Unit Size" should remain on "Default". Finally select "Perform Quick Format" and click on "Next". 10. Click on "Finish" to complete the partitioning of your MediaPlayer-3. Your MediaPlayer-3 will be formatted now and is ready-to-use afterwards.
Partitioning your MediaPlayer-3 GB 7 7.4.3 Creating two or more partitions on the MediaPlayer-3 under Windows XP / 2000 1. Repeat the steps from the previous chapter (Creating a partition on the MediaPlayer-3 under Windows XP/2000) for creating the first partition. 2. Click with the right mouse button on the "My Computer" icon on your desktop. 3. Select the option "Manage". 4. Select the option "Storage" -> "Disk Management". 5.
Freecom MediaPlayer-3 7. Now you can adjust the size of your partition. Enter the size and click on "Next". GB 6 8. Click on "Finish" to create the "Extended partition". The unallocated space now changed to "Free space".
Partitioning your MediaPlayer-3 GB 7 9. Right-click on "Free Space" and select "New Logical Drive" (Windows 2000: "Create Logical Drive"). The "New Partition Wizard" (Windows 2000: "Create Partition Wizard") opens. Click on "Next".
Freecom MediaPlayer-3 10. "Logical drive" is already selected. Click on "Next". GB 11. Specify the partition size and click on "Next". 12. Assign a drive letter and click on "Next". 7 13. Select the formatting option. Choose either "FAT32" or "NTFS", the "Allocation Unit Size" should remain on "Default". Finally select "Perform Quick Format" and click on "Next". 14. Click on "Finish" to complete partitioning. Your partition will be formatted now and is ready-to-use.
Troubleshooting / Frequently Asked Questions (FAQ) Chapter 8: Troubleshooting / Frequently Asked Questions (FAQ) GB 7 8.1 USB CONNECTION • Why can’t I see the drive in the file manager after I reboot my computer? 1> Make sure the assembled HDD is installed correctly, and that the USB cable is connected to your computer. 2> It may because the USB2.0 driver is not installed correctly. Re-install the driver and reboot your computer.
Freecom MediaPlayer-3 • GB My picture is in black and white Enter the setup menu and go to the video menu and change the settings here to fit your TV screen, this usually happens if the player is set to use svideo instead of Component. 8 • When I power on player, the initial screen appears but the player does not turn to Video Audio Photo select mode Please format the player in FAT-32 format. Also, check the hard drive jumper pin as MA(master) and primary partition option. 8.
Firmware Upgrade Firmware Upgrade GB We provide you with the latest and best features through Firmware Upgrade. 8 Firmware Upgrade Instructions 1. Connect the AC adapter to the player. (Caution: Only upgrade the firmware on the player with the AC adapter connected.) 2. Connect the device to a PC with the USB Cable. Please see Page xxx for how to connect the product to a PC. 3. Download the latest Firmware file from the Freecom website. 4. Copy the firmware file to any folder of the player. 5.
Freecom MediaPlayer-3 Technical Specifications GB Interface 8 Video Connections: Composite x 1 S-Video x 1 Component 1080i/ 720p?480p?480i (Progressive Scan) Cable not supplied. Audio Connections: Stereo Audio (L/R) x1 Optical Digital Audio 1 (Dolby Digital & DTS) Additional DTS Decoder required for DTS digital output. Output Connectors: Composite, Component, S-Video Display (Main Set): 1.2 inch Backlit LCD 168 X 168 pixels, 4 gray Colors USB Interface: USB Spec: USB 2.
Technical Specifications Support Format Video: GB File Type Video Codec Audio Codec Remarks DAT MPEG-1 MPEG-1 Subtitle: SMI, SRT, SUB VOB MPEG-2 MPEG-2 Resolution Max. 720 x 576 MPG, MPA MPEG-2 MPEG-2 Frame Rate Max. 30fps 8 M1V, M2V AVI DivX® Video, MP3, AC3, XviD DTS Do no support GMC(Global Motion Compensation), AVI MS MPEG4 MP3, AC3, QP (Quarter Pixel) Feature.
Freecom MediaPlayer-3 Environmental Specifications GB Rating Power Voltage: AC 100~240V±10% ; 50/60Hz / External AC/DC Adapter 8 40 AC output current (converted power): 5V, 1.5A / 12V, 1.5A Power consumption: Max. 7W Operation Temperatures: 5 to 35 deg C Operating Conditions Humidity (%) 20 to 80% Non-condensation Dimensions: 129(W)x205mm(D)x45(H) Weight: Approx.
WARRANTY (valid in Europe/Turkey only): We thank you for purchasing this Freecom product and hope you will enjoy using it. In order to avoid unnecessary inconvenience on your part, we suggest reading the quick install guide, instruction manual and any additional electronic and or printed manuals. When problems occur we have a database with Frequently Asked Questions (FAQ) on our Freecom website (www.freecom.com), please check this site before you contact the helpdesk.