USER MANUAL MEDIA PLAYER II EXTERNAL MULTIMEDIA HARD DRIVE / 3.5" / LAN / USB 2.0 / AV Rev.
Freecom MediaPlayer II Dear user! EN Thank you for buying the Freecom MediaPlayer II, a brand-new digital multimedia player that supports dual data access mode via 3.5" HDD inside (not supplied with "Drive In Kit"-model) and 10/100Mbps Network. With this Freecom MediaPlayer II you can easily enjoy Digital Movies, Digital Music, Digital Photos from a 3.5" HDD (when assembled in the device) and from all PC's in your network, directly on your TV or HiFi set.
Table of Contents User manual General Information............................................................................................................page 4 Important note...............................................................................................................page 4 Specification...................................................................................................................page 4 Minimum System Requirements...............................................
Freecom MediaPlayer II General Information EN Important note: The Freecom device has not been developed or conceived for use with disregard to copyrights or other rights to intellectual property. The Freecom device can only be used with material which is the legal property of the user or where the user has a legal licence for this purpose so that such use must be permitted because of these property rights or licenses. This product is protected by certain intellectual property rights of Microsoft.
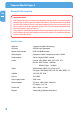
General Information Minimum System Requirements EN PC: • Intel Pentium III / AMD Duron 900 MHz or higher • 256 MB RAM (Vista: 512 MB RAM) or higher • Available USB 2.0, 1.1 Port (USB 2.0 recommended)* • Available 10/100 Ethernet LAN Port, RJ45 (100 Mbps recommended) or WLAN • LAN Cable • For playback on TV, a TV set with PAL or NTSC system is required. • Supported HDD: Compatible with standard 3.
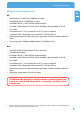
Freecom MediaPlayer II Precautions EN Please read the following in this manual carefully for proper use. Copyright • Freecom can not be held responsible for the use of illegal software, audio sources, video sources etc. The user and/or owner of the Freecom MediaPlayer II is legally responsible for the content on the device. Check supported codec • The Freecom MediaPlayer II may not play back all media files. Please check the codec type and ensure this is supported by the MediaPlayer II.
General Information Cautions for possibility of causing Radio Waves to cross • EN Freecom MediaPlayer II may cause Radio Waves to cross, so it is recommended to be alert when you keep devices near the Freecom MediaPlayer II. Especially concerning your health. Data Backup • We strongly recommend you to make a data backup to another safe medium. Freecom can not be held responsible for data damage or data loss on the built-in hard drive. Cautions for drop, shock • Do not drop the device.
Freecom MediaPlayer II Warnings and Safety Instructions EN Please read and follow the below mentioned instructions. They should be observed in order to prevent injury to the user, damage to the device and damage to property, as well as to ensure safe use of the product. Not following these instructions may cause the unit to malfunction. To ensure that your Freecom MediaPlayer II functions properly, please take note of the following precautions.
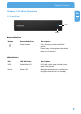
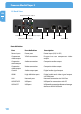
Product Overview Chapter 1: Product Overview EN 1.1 Front View 1 LED Power Button definition Button Button definition Description Power button Press shortly to switch on/off the power. Please note: shutting down the device takes ca. 15 seconds! LED definition LED LED definition Description HDD Read/Write LED LED lights when copy, twinkles when data is transferred. Power Power LED Blue light when device is switched on, red light when device is in standby.
Freecom MediaPlayer II 1.
Product Overview 1.
Freecom MediaPlayer II Navigation key for up, down, left and right EN 1 ENTER Press to confirm selection PREV Press to return to previous file NEXT Press to go to next file VOL- Press to decrease the volume VOL+ Press to increase the volume PLAY Press to play file STOP Press to stop playback PAUSE/STEP Press to pause playback, press again for step playing REPEAT Press to set repeat option: chapter, title or off COPY Enter the copy mode SELECT Press to select a file or folder and then
Basic operation Chapter 2: Basic operation EN 2.1 First steps 2 1. Power connection Take out power adapter from the package and connect it to the device. 2. Connection of TV audio output The product is designed with multi-output, including composite (AV), component (YPbPr). and HDMI. You can select different interfaces according to various needs. The product can detect video output automatically, making the operation user-friendly and convenient.
Freecom MediaPlayer II Coaxial output connection EN 2 Coaxial output: Connect the product coaxial connector with the coaxial connector of your video or audio device by using a coaxial cable. Enter the product's audio setup and select the Digital Output option "SPDIF LPCM" or "SPDIF RAW". It is possible to enjoy 5.1 high quality sound through a multi channel decoder/amplifier with coaxial input.
Basic operation 2.2 Network Setup under Windows XP and Windows Vista EN 2.2.1 Windows XP 2 Two conditions are necessary for a successful setup network connection: 1. Folder sharing and safety setup. 2. Set the same gateway and subnet address. Procedure of file sharing under Windows XP: 1. Select the folder to be shared, right-click mouse and select the option" Sharing and Security". 2.
Freecom MediaPlayer II 3. Open Control Panel -> Administrative Tools -> Computer Management -> Local Users and Groups" and click "Users" option. Right click "Guest" and select "Properties". EN 2 4. Select 'Users can not change password' and 'Password never expires'. Keep the other checkboxes unchecked. 5. Open Control Panel -> Network Connections and select "Local Area connection" Right-click to select "Properties".
Basic operation EN 2 6. Select ‘Internet Protocol (TCP/IP)’ and click on "Properties". 7. Set up the relevant IP address, subnet mask and gateway. This can also be done automatically (DHCP). 8. Click on OK to complete the Network Sharing procedure.
Freecom MediaPlayer II 2.2.2 Windows Vista EN 1. Please make sure that you have administrator rights on your Vista system. 2. Select Control Panel -> User Accounts and Family Safety. 2 3. Select "User Accounts" -> "Manage another account". Click on the "Guest" account and select "Turn on" if it is turned off. 4. Select the folder to share and right-click on it. Then select the "Share" option. 5. Add the "Guest" account to the list. 6. Select "Share" and then the folder will be shared.
Basic operation Follow the instructions as shown in the above picture and connect the device to PC. Power on the PC and enter the system. The PC detects the device automatically and then the device can be used as an external USB storage device. After data transfer is finished, please remove the USB storage device safely (click the USB device icon to stop the USB device and then pull out the USB cable). EN 2 Notes: 1. Please don’t power off when the device is busy (reading/writing data). 2.
Freecom MediaPlayer II Chapter 3: Using the product EN 3.1 Browse and play media files 3 Power on the HDD Player. The system shows the main menu after a few seconds. Four options will be available:. With these functions, you can browse movie, photo and music files stored in HDD, network and USB by pressing the " " and " " navigation buttons to choose the source device. Press the "ENTER" button to confirm your selection.
Using the product File Edit menu EN Select a file or folder by pressing the navigation button. Press OPTION button on the remote control to rename or delete files and press the "ENTER" button to confirm. Return Select to return to the first menu Rename Please refer to the following procedure to rename a file: 3 1. Select Rename. 2. The edit window appears after pressing ENTER key. 3. Use the navigation arrows to select letters and numbers. CAPS to toggle between uppercase and lowercase letters.
Freecom MediaPlayer II 3.1.1 Network EN My shortcut Select a PC in the menu or add one available IP address to access media files in network through My_Shortcuts. 3 3.2 File Copy The File Copy function allows copying files between HDD, USB or Network. Press the COPY button on the remote control to copy files from one media to another. 3.2.1 Copy operation Step 1: Select Source Device Press and to select the device from where files are to be copied.
Using the product Step 4: Select the destination folder Press or to select a target folder in the destination sector. Press or press to return. EN for the next step 3 Step 5: Copy Status In the menu, select ENTER to copy or select NO to cancel. After file copy is finished, the system will display "File Copy is completed!" or "File Copy failed!". Select "Ok" to return to the Main menu or select "No" to return to the Copy menu. 3.
Freecom MediaPlayer II Changing Audio Settings EN Night Mode "On" "Off" and "Comfort mode" are available In comfort mode, the volume is restricted automatically so that it would not affect other people from rest or working. 3 Digital output The following options are available: - HDMI LPCM - HDMI RAW - SPDIF LPCM - SPDIF RAW Changing Video Settings Screen Ratio - Pan Scan 4:3 Displays a wide picture on the entire screen and cuts off the redundant portions when a standard 4:3 TV is connected.
Using the product Changing Network Settings EN Note: A WLAN USB Stick is optionally available on www.freecom.com. Wired LAN Setup Wireless LAN Setup: and Check the following items before using this function: Wireless LAN Setup - Connection between product and network - Network protocol is available - Files are shared 3 Auto: Automatically set IP address Manual: Select IP address, subnet address and default gateway. These can be entered through navigation and numeric key.
Freecom MediaPlayer II EN 3 Wireless Setup Enter the SETUP by pressing the SETUP button on the remote control. Select NET -> Wireless Setup and press OK to enter. When using this feature for the first time, select MODIFY and follow the setup step-by-step. 26 Select INFRASTRUCTURE or PEER TO PEER, according to your needs.
Using the product Wireless LAN Connection EN Freecom MediaPlayer II supports two types of wireless structure modes: Infrastructure mode & Ad-Hoc mode (Peer-to-peer). Ad-Hoc Mode 3 Infrastructure Mode (AP) Ad-Hoc Mode (Peer-to-peer) 1:1 wireless LAN connection type between wireless adapter and Freecom MediaPlayer II without wireless access point. Infrastructure Mode (AP) Wireless LAN connection type with Wireless Access Point.
Freecom MediaPlayer II Infrastructure Mode EN 3 You can insert a USB wireless network card to the USB HOST interface on startup of the device or you can insert a USB wireless network card at this time. The screen will show WIFI PLUG-IN. "Auto" allows to automatically search for Wireless SSID.
Using the product EN 3 Select the encryption mode of your Access Point: - Open System - Shared Key (WEP) - WPA/WPA2 Key and press ENTER on the remote control. Enter your password, if required.
Freecom MediaPlayer II EN 3 You can choose DHCP IP (AUTO) to obtain a dynamic IP or choose FIX IP (MANUAL) to set a fixed IP. The parameters are shown in the SETTING LIST as follows : 30 Press ENTER on the remote control. After the connection was established successfully, you will see a summary where IP address, subnet mask and default gateway are shown. Press ENTER again to return to the Network Setup.
Using the product Select "NETWORK" in the main menu. You will see not only "My_Shortcuts" and "My_ Neighbors", but also all shared folders in your network. This indicates the success of your wireless connection setup.
Freecom MediaPlayer II Peer-to-peer mode (Ad-hoc mode) EN Use "Peer-to-peer" to create a wireless network between your Mediaplayer and another computer without using a WLAN router. Such networks are sometimes also referred to as ad-hoc networks. 3 To establish a peer-to-peer network a USB WLAN stick for the Mediaplayer and a WLANcapable computer/notebook are required. See the help of your operating system or the manual of your WLAN USB Stick on how to setup an ad-hoc network on your computer.
Using the product EN 3 Set the name of product in wireless network as wireless SSID. Set the host IP address and make sure that the IP address does not conflict with the USB wireless network card IP addresses of your computer. Save settings and test. After successful test, network information will be shown. Press ENTER to return to the Network Setup.
Freecom MediaPlayer II EN 3 In the main interface of the " NETWORK ", select "MY_SHORTCUTS".
Using the product Press the "Option" button on the remote control. In the pop-up window select "add" to add a new shortcut. The user will be GUEST, as IP address the IP address of the computer in your peer-to-peer network has to be entered. EN 3 Save settings and select the shortcut to enter. You will now have access to the IP address of the host to share the contents of the host.
Freecom MediaPlayer II Changing System Settings EN Menu Language Choose the OSD (On Screen Display) language. Text Encoding Change character encoding. Login Control Activate login control (password) for the device web interface. System Info Start, stop, upgrade or uninstall system services.
Using the product System Update Upgrade your system here. EN 3 HDD Format Use this option to format the built-in HDD. ATTENTION! The internal hard disk will be formatted in NTFS format. Mac users have read-only access when connecting the device via USB to their Mac. To copy data from Mac to the Mediaplayer, network connection must be used. Restore Default Restore factory settings of your Mediaplayer.
Freecom MediaPlayer II Chapter 4: Installing BT_SAMBA EN BT Player is a system software, it consists of the operating system (Linux+AP) and the application software (BT_SAMBA). 4 4.1 Initial installation When inserting a hard disk to the system for the first time, the system will start with the hard disk format interface. You can also press "SETUP" on the remote control to open the Setup menu and select "HDD Format" to format HDD. Step 1: Press " " and " " on the remote control to make a selection.
Install BT_SAMBA Step 4: Congratulation page EN When formatting is finished, the system will display a congratulation page. Select OK button and Press "ENTER" to exit. The system will boot up automatically. 4 4.2 Neighbor Web interface When the Mediaplayer has a network connection, you can use the player’s IP address to access the "Neighbor Web" interface of the Mediaplayer. Open the Internet Explorer and enter the Mediaplayer IP address. The Neighbor Web will display the Bittorrent and Player Status.
Freecom MediaPlayer II 4.4 Add new torrent EN Select 4 to add a new torrent download. On the "Add new torrent" page, click the "Browse" button to choose a torrent file path from local PC. When you select a torrent file, press "Open" button to add. Next , click "Yes" to confirm your selected file and to go back to the BitTorrent download page, otherwise click "No" to do nothing and to go back to the BitTorrent download page.
Install BT_SAMBA 1. Download Page EN 4 When clicking on a torrent file name, at the bottom of the page the torrent file information will be displayed. When the box on the left side of the file name is checked, it means that the file is selected. You ca now select "Start" ,"Stop" ,"Delete" ,"Refresh" and sort order "up" and "down". 2. BitTorrent Setting Press "Setting" to open the BitTorrent setting page. Set maximum download rate, maximum upload rate and seeding setting in the setting page.
Freecom MediaPlayer II 4.5 "Visit neighbor" function EN On the device home page, select "Visit neighbor" to browse the HDD files. 4 ATTENTION: This feature is only available when using the Internet Explorer! It will not work with other browsers, e.g. Firefox or Opera. 4.6 Account Management On the device home page, select "Account Management" to access the Account Management page. When "Account Management" cannot be started, please confirm in the Mediaplayer Setup that Login control is set to ON.
WARRANTY (valid in Europe/Turkey only) We thank you for purchasing this Freecom product and hope you will enjoy using it. In order to avoid unnecessary inconvenience on your part, we suggest reading the quick install guide, instruction manual and any additional electronic and or printed manuals. When problems occur we have a database with Frequently Asked Questions (FAQ) on our Freecom website (www.freecom.com), please check this site before you contact the helpdesk.