USER MANUAL HARD DRIVE DOCK EXTERNAL DOCKING STATION / 2.5" & 3.5" SATA / USB 2.0 / eSATA Rev.
Freecom HD Dock Dear user, EN welcome to the installation of your Freecom HD Dock. Before installing the drive, please read through the following points regarding its compatibility with your system. Freecom Technologies • Germany www.freecom.com Contents of the box Please check the contents of the box; the following items should be included: • Freecom HD Dock • USB 2.0 cable • eSATA cable • External power supply (DC12V/2A) • Manual on CD • Quick Install Guide Warning ! All rights reserved.
Table of Contents User manual General information............................................................................................................ Page EN 4 Chapter 1: Start Up the HD Dock.......................................................................................................... Page 6 Chapter 2: Ejecting the HD from the Dock........................................................................................ Page 7 Chapter 3: Partitioning your HD.........................
Freecom HD Dock General information EN The following hardware and software requirements must be fulfilled to ensure troublefree operation. System requirements In order to use the Freecom HD Dock, following components are needed: PC: • Intel Pentium III / AMD Duron 900 MHz or higher • 256 MB RAM (Vista: 512 MB RAM) or higher • Available USB 2.0 or USB 1.
General information Precautionary Measures and General Notes • EN Make sure the label side of the hard drive is ahead, and the hard drive connector is downward before it is inserted. Otherwise, the hard drive can not be inserted. • Do not eject the hard drive while it is working. • Hold the hard drive with its front edge instead of the PCB at the bottom side. • Hard drives are precise equipment. Read the user manual attached with the hard drive before using.
Freecom HD Dock Chapter 1: Start Up the HD Dock EN 1.1 HDD installation for . " or . " 1 1. Connect the cable of the power supply to the Freecom HD Dock and the power supply itself to the socket. 2a. USB: Connect the USB cable to the USB port on the HD Dock (for data transfer with USB). or 2b. eSATA: Connect the eSATA cable to the eSATA port on the HD Dock (for data transfer with eSATA). 3.
Ejecting the HD from the Dock 5. Partition and format your hard drive (if required). See chapter 3 for further details. EN PC: Your hard drive appears in "My Computer" and can be used now. Mac: Your hard drive appears on the desktop and can be used now. 1. LED LED on: HD Dock switched on LED flashes: Data transfer Chapter : Ejecting the HD from the Dock 1. Switch off the power. 2. Press the button down. 3. Gently remove the hard drive off in vertical direction.
Freecom HD Dock Chapter 3: Partitioning your HD EN 3.1 General information 3 Your hard drive must be partitioned and formatted before it can be used. This chapter describes current limitations of most common file systems and instructions to enable you to adapt your hard drive to your needs. 3.
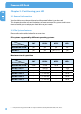
Partitioning your HD Example for different partitions with different file systems on one HD EN File system Total size of HD 80 GB NTFS FAT32 60 GB 20 GB 3 Note: On NTFS formatted hard disks data can only be written under Windows XP / Vista. Under Mac OS X data can only be read. The example above is a good solution for Windows XP / Vista users who sometimes exchange data with Macs. For storing the data under Windows XP / Vista both partitions can be used.
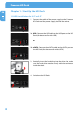
Freecom HD Dock EN 3 5. Click with the right mouse button on the "unallocated" area and select the option "New Partition". The "New Partition Wizard" opens. Click on "Next".
Partitioning your HD 6. Select "Primary partition" and click on "Next". EN 3 7. Now you can adjust the size of your partition. Click on "Next" if only one partition is to be created. See next chapter (Creating two or more partitions on the HD under Windows XP / Vista) how to create more than one partition. 8. Assign a drive letter to your hard disk. Normally you can use the default options. Click on "Next".
Freecom HD Dock 9. Select the formatting option "Format this partition with the following settings". Choose either "FAT32" or "NTFS", the "Allocation unit size" should remain on "Default". Finally select "Perform a quick format" and click on "Next". EN 3 10. Click on "Finish" to complete the partitioning of your hard drive. Your hard drive will be formatted now and is ready-to-use afterwards.
Partitioning your HD 3.3.3 Creating two or more partitions on the HD under Windows XP / Vista EN 1. Repeat the steps from the previous chapter (Creating a partition on the hard drive under Windows XP / Vista) for creating the first partition. 3 2. Click with the right mouse button on the "My Computer" icon on your desktop. 3. Select the option "Manage". 4. Select the option "Storage" -> "Disk Management". 5. Right-click on the unallocated space of your hard drive and select the option "New partition".
Freecom HD Dock 8. Click on "Finish" to create the "Extended partition". The unallocated space now changed to "Free space".
Partitioning your HD 9. Right-click on "Free Space" and select "New Logical Drive" (Windows 2000: "Create Logical Drive"). The "New Partition Wizard" (Windows 2000: "Create Partition Wizard") opens. Click on "Next". EN 3 10. "Logical drive" is already selected. Click on "Next". 11. Specify the partition size and click on "Next". 12. Assign a drive letter and click on "Next". 13. Select the formatting option "Format this partition with the following settings".
Freecom HD Dock 3.4 Partitioning your HD under Mac OS X EN 1. Open the "Disk Utility". This can be found in "Applications" —> "Utilities". 2. Click on the tab "Partition". 3 Here you can setup the partition settings and partition the drive according to your settings (e.g. Mac OS Extended).
Trouble shooting - FAQ Chapter 4: Trouble shooting - FAQ EN If you still have problems getting your Freecom HD Dock to function properly despite having installed it correctly, then please check the following items: • 4 What can I do when the hard drive does not work and there is cklicking noise arising from it? It means the power supply is not adequate enough to start the hard drive.
WARRANTY (valid in Europe/Turkey only) We thank you for purchasing this Freecom product and hope you will enjoy using it. In order to avoid unnecessary inconvenience on your part, we suggest reading the quick install guide, instruction manual and any additional electronic and or printed manuals. When problems occur we have a database with Frequently Asked Questions (FAQ) on our Freecom website (www.freecom.com), please check this site before you contact the helpdesk.