
Installation Sheet


FRIS 19-92
hanging instruction
start here
SAFETY WARNING: READ WIRING AND GROUNDING INSTRUCTIONS
(IS 18) AND ANY ADDITIONAL DIRECTIONS. TURN POWER SUPPLY OFF
DURING INSTALLATION. IF NEW WIRING IS REQUIRED, CONSULT A
QUALIFIED ELECTRICIAN OR LOCAL AUTHORITIES FOR CODE
REQUIREMENTS.
1. S
h
u
t
o
f
f
e
l
e
ct
r
ic
a
l
cu
r
r
e
n
t b
e
f
o
r
e
s
t
a
r
t
i
n
g
.
I
f
t
h
e
fi
x
t
u
r
e
y
o
u
a
re repl
a
c
ing i
s turned o
n and of
f
b
y a wa
ll
s
w
itc
h, s
imply tu
rn
t
he switch off. If not, re
mo
ve t
h
e
ap
p
ro
p
r
iate
f
u
s
e
(
o
r
o
p
e
n
t
h
e
ci
rcu
i
t b
re
a
k
e
r
s)
u
n
t
i
l
t
h
e
f
ix
t
ur
e
i
s d
e
ad.
DO NOT re
s
to
r
e
c
u
r
r
e
n
t
--
-
e
i
t
h
er b
y
f
u
se
,
b
r
e
a
k
e
r
,
o
r
s
w
i
tch --
-
u
n
til
the
n
ew
fix
t
u
re i
s c
o
m
p
le
t
e
l
y w
i
re
d
a
n
d
i
n
p
l
a
c
e
.
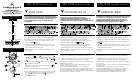
1. Determine the desired height the chandelier will be installed.
2. The fixture is supplied with assorted stem sizes. Determine
what combinations of stems are needed to achieve desired
length --- see D
raw
ing
1.
3. Slip stems over wire and thread first stem into coupler on top
of chandelier, longest stem first. Repeat this process until all
required stems are threaded together.
4. Slip wire through center of canopy swivel and thread onto
stem assembly.
1. Thread two long 8
-
3
2
screws (
1
) into the mounting strap (
2)
.
NOTE: The two screws should be threaded into the holes
that line up with the holes in the canopy (
3)
--- see D
r
a
w
i
n
g
2
.
2. Attach the mounting strap (2) to the junction box with two 8-
3
2 screws (5) not provided.
3. Make wire connections following the instructions on (I
S
1
8
)
instruction sheet provided.
4. Assistance is recommended for the following process.
5. Lift assembled fixture with stems and canopy up to ceiling and
slip screws (
1) through holes in canopy (3). Secure fixture to
mounting strap by threading ball knobs (
4)
onto end of
screws (
1
)
and tighten.
FRIS 19-92
pendaison instruction
commencez ici
AVERTISSEMENT DE SECURITE: LIRE CABLAGE ET INSTRUCTIONS DE
MISE (IS 18), ET TOUTE AUTRE INSTRUCTION. COUPER
L’ALIMENTATION ELECTRIQUE PENDANT L’ONSTALLATION. SI DE
NOUVELLES CABLAGE N’EST NECESSAIRE, CONSULTEZ UN
ELECTRICIEN QUALIFIE OU AUTORITES LOCALES POUR EXIGENCES DU
CODE.
1. C
o
u
p
er l
e cou
ra
nt éke
ctr
ique a
va
nt
de
c
om
m
ence
r. S
i l’ap
pare
il
v
ous
r
e
mp
lacez est activeé et désactivé par un interrupteur mural,
i
l s
u
ffit de
t
our
ner
l
’
inte
rru
pteur
. S
in
on
,
r
et
ir
e
z
le
fusib
le
a
p
p
rop
r
ié *ou ou
v
rez les di
s
joncteurs) jusqu’á ce que l’appareil
e
s
t m
o
r
t
.
N
E
P
A
S
r
estaurer actuel --- soit par fusible, disjoncteur,
i
nt
e
r
ru
pteur
ou
-
-
-
ju
st
qu
’á
ce
w
u
e
l
e
nou
ve
l ap
pa
r
e
il e
s
t
e
n
t
ié
r
e
m
e
nt câblé et en place.
1. Déterminer la hauteur désirée du luster sera installé.
2. L’appareil est fourni avec des tailles de souches variées.
Déterminer quelles combinaisons de tiges sont nécessaires pour
atteindre la longuer désirée --- V
o
ir S
c
hém
a
1
.
3. Slpi tient sur le fil et le fil premiére tige dans le coupleur sur le
dessus du lustre, tige la plus longue premier. Répétez cette
opération jusqu’á ce que toutes les tiges nécessaires sont enfilées.
4. Glisser le fil par le centre de pivotement de la canopée et du fil
sur l’assemblage de la tige.
FRIS 19-92
colgando de instrucciones
empezar aquí
ADVERTENCIA DE SEGURIDAD: LEA LAS INSTRUCCIONES DE CABLEADO
Y LA TIERRA (IS 18), E INSTRUCCIONES ADICIONALES. APAUGE LA
ALIMENTACIÓN DE CORRIENTE DURANTE LA INSTALACIÓN. SI SE
REQUIERE NUEVO CABLEADO, CONSULTE CON UN ELECTRICISTA O
AUTHORIDADES LOCALES PARA REQUISITOS DEL CÓDIGO.
1. Apa
gu
e
la
corri
e
n
t
e
elé
ctri
ca an
tes de
c
o
m
e
nz
a
r. Si e
l
ap
a
r
ato
v
a a sustituir se
e
nc
i
e
n
de y
s
e
a
p
aga por
u
n interrup
to
r d
e
p
a
r
e
d
,
sim
p
lemen
t
e gir
e
e
l i
nt
e
rrupor. Si n
o es a
s
í
, q
uite
el
f
us
i
ble
a
decuado
(o
abr
a l
os inter
r
up
t
or
e
s de cir
c
ui
t
o) hasta
q
ue e
l
a
p
arato e
st
á
mu
e
rt
o.
No r
e
s
t
aurar ac
tual
--
-
ya sea mediante fusible, d
i
s
yuntor
o
i
nt
er
ru
p
to
r
--
-
h
a
s
t
a
q
ue el nuevo d
i
sposi
t
ivo es
t
á
c
omple
t
a
me
nte co
n
e
ct
do
y
en
s
u l
ug
ar.
1. Determine the desired height the chandelier will be installed.
2. The fixture is supplied with assorted stem sizes. Determine what
combinations of stems are needed to achieve desired length --- see
D
r
aw
i
n
g
1.
3. Slip stems over wire and thread first stem into coupler on top of
chandelier, longest stem first. Repeat this process until all required
stems are threaded together.
4. Slip wire through center of canopy swivel and thread onto stem
assembly.
Drawin
g
1 – Fixture Mountin
g
g
stem
wire
wire
wire
stem
main fixture body
2223
4
2
1
5
supply wire
Drawin
g
2 – Fixture Mountin
g
1. Pase dos 8-32 tornillos largos (1) en la brida de montaje (2).
NOTA: los dos tornillos deben ser roscados en los orificios que se
alinean con los agujeros en la campana (3) - ver dibujo 2.
2. Coloque la correa de montaje (2) a la caja de conexiones con dos
tornillos 8-32 no previstos.
3. Realice todas las conexiones de los cables siguientes hoja de
instrucciones (IS18) proporcionado.
4. Se recomienda asistencia para el proceso de seguimiento.
5. Levante montado accesorio, con tallos y dosel hasta el techo, y los
tornillos de deslizamiento (1) a través de agujeros en el dosel (3).
Fijación segura de la cinta de montaje enroscando perillas de bolas (4)
en el extremo de los tornillos (1) y apriete.
1. Enfilez deux longues vis 8-32 (1) dans la sangle de fixation (2).
REMARQUE: les deux vis doivent être vissés dans les trous qui se
alignent avec les trous dans la canopée (3) - voir schéma 2.
2. Fixez la sangle de montage (2) à la boîte de jonction avec deux vis
8-32 pas fourni.
3. Assurez-vous que toutes les connexions suivantes feuille d'instruc-
tion (IS18) fourni.
4. Assistance est recommandé pour le processus de suivi.
5. Soulevez assemblé luminaire, avec des tiges et la verrière au
plafond, et les vis de glissement (1) à travers des trous dans la
canopée (3). Fixation sûre à la sangle de montage en enfilant
boutons sphériques (4) sur l'extrémité de la vis (1) et serrer.