
Use and Care Guide

2
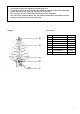
1) Installation
• Take out the umbrella-shaped base, unfold it.
Connect transformer plug with the socket on
the bottom.
• Take out the Christmas tree and insert the
tree pipe into the support of umbrella-shaped
base, turn the pipe so that both holes are fully
aligned, then fasten it with a screw.
• Unfold tree branches and arrange them to
your desired shape.
• Take out the top star. Fit it on the pipe of the
tree top and insert the plug into the No.1
socket in the base. Note: The top must be set
square in the center, to avoid snowflakes
flying everywhere.
• Decorate the Christmas tree with the lamp
string and insert the plug into the No.2 socket
in the base, and coil the string around the tree
branches properly.
• Arrange the ornaments on the branches
properly to avoid it fall into the container and
block the flow of snow flakes.
2) Functionality test
• All the above instructions must be completed.
• Clean off all foreign matter in the
umbrella-shaped container, to avoid the
blocking the flow of snow flakes.
• Set the switch at OFF and connect the
transformer with power source;
• Put a small amount of snow flakes at the
bottom of the snow container, and turn on the
switch, to observe if flakes spout out from the
top of the tree. Check normal functioning of
music and lamps. If there are any issues,
check the wiring again.
3) Pour in the flakes
• Turn off the switch.
• Pour the snow flakes into the
umbrella-shaped container and let it distribute
evenly in it.
4) Completion of assembling
• Turn on the switch; you should see
snowflakes spouting from the top of the tree,
the top star lighting, the lamps flashing and
music starting. Now all assembling has been
completed.
5) Adjust and enjoy
• Adjust the wind switch to get appropriate wind
for best snow flying effect, and also avoid
flakes flying out of the container.
• Music can be controlled by the switch on the
bottom and can be turned off when not
needed.
Assembly Instructions