
Instructions / Assembly

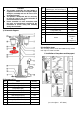

B. Power-on: Tightly connect the connectors (1) and (4) of
adapter (8) and power wire (10). If the power wire (10) is
not long enough, extended wire (9) between them and then
connect the adapter and main power.
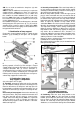
C. Waterproof: If the street lamp is used outdoor, please
complete the below (see series figures a-e):
a. Please screw the nut at top of lamp holder tightly;
otherwise this will affect the item from being waterproof.
b. All connection points 1 and 2, 3 and 4, 5 and 6, 7 or 8
and lamp holder must be screwed tightly to avoid water
and electricity leakage.
c. The adapter itself is not waterproof, and it is required
that the connecting point between adapter and main
power should be located indoors, free from rain and
snow to avoid the electricity leakage or electric shock
risk.
d. The two ends of lamp support are arranged with drip
hole, and this hole should be unobstructed.
e. The lamp holder should be kept vertical and avoid
inclined to ensure the waterproof effect.
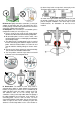
D. Examination: The bottom of each lamp holder is
arranged with a switch (as shown below). One of the lamp
holders can play music, and the music is controlled by its
switch (left figure); when the switch is placed on the left.
You should be able to see the shining light and
snowflakes falling in this lamp holder, with music playing. If
the above-mentioned isn’t functioning, check whether all
connecting points 1 and 2, 3 and 4, 5 and 6, 7 or 8 are
connected well with its lamp holder. You can also place this
switch at right to close music according to your own
demand. A similar lamp holder has the same function as
the above lamp holder except that it cannot play music.
The below switch function is shown on the right.
5. Decorate and enjoy
As shown in the figure below, arrange the plaque (16) and
the wreath + bowknot (17) to the upper side of the lamp
post to complete installation. If the street lamp is to be
installed outside, the decorations do not have to be
installed.
√